
Outdoor kitchen planning Utah: utilities, weatherproof materials, and a layout that actually works
Outdoor Kitchen Planning: Utilities, Weather, and Long-Term Durability
Outdoor kitchens are one of the highest “lifestyle ROI” upgrades a homeowner can make—when they’re planned like a real kitchen and built for real weather.
In Utah, the difference between an outdoor kitchen you love for a decade and one you regret in two seasons usually comes down to three things:
- Utilities planned early (gas, electric, water, drainage, and lighting)
- Placement that respects sun and wind (comfort and smoke control)
- Materials and details that survive freeze–thaw (durability and safety)
Related resources while you plan:
- Outdoor Living Spaces Designed for Utah Living
- Outdoor Living in Utah: Deck vs. Patio vs. Covered Space
- Whole-Home Remodel Sequencing
- Home Addition Cost Drivers in Utah
- Request a Design Consult
The Fortress Builders is a Utah design–build company built on one principle: strength through structure. That mindset matters outdoors—because weather doesn’t care how good your cabinets look if water management, ventilation, and utility planning were skipped.
The easiest way to ruin an outdoor kitchen is to pour hardscape before you plan utilities
Outdoor kitchens don’t fail because homeowners pick the “wrong grill.” They fail because the project gets treated like a decorative feature instead of a small, weather-exposed building system that needs utilities, ventilation logic, and durable construction details.
If you only remember one rule from this guide, make it this:
Rule #1: Create a utilities plan before concrete, pavers, or decking goes in. It’s cheaper, cleaner, and the only way to avoid awkward layouts and expensive rework.
This planning guide covers the core topics homeowners search for:
- outdoor kitchen planning Utah (where to start and what matters most)
- outdoor kitchen utilities gas electric water (what you actually need and why)
- weatherproof outdoor kitchen materials (what holds up outside)
- freeze thaw outdoor kitchen durability (Utah-specific durability)
- outdoor kitchen layout workflow (why layout beats “cool features”)
Step 1: Define what “cooking outside” means for your household
Outdoor kitchens range from “simple grill station” to full entertaining hub with refrigeration, sink, pizza oven, and storage. The best plan starts by defining how you will actually use it most weeks—not how you imagine using it once a year.
Choose your outdoor kitchen type
Pick the closest match:
- Level 1: Grill station — Grill + prep counter + protected storage.
- Level 2: Entertaining bar — Grill + prep + beverage fridge + serving counter.
- Level 3: Full outdoor kitchen — Grill + sink + refrigeration + storage + dedicated work zones.
- Level 4: Outdoor room — Kitchen + cover structure + lighting + heating/fans + seating zones.
Cooking needs checklist (use this to set scope)
- How many people do you usually cook for? (daily family vs. hosting groups)
- Do you cook with gas, charcoal, pellet, or a mix?
- Do you want a sink (handwashing, food prep, cleanup)?
- Do you want refrigeration (drinks, prep items, overflow storage)?
- Do you want a pizza oven or specialty appliance?
- Do you want a bar/serving counter so guests aren’t standing in your work zone?
- Do you want storage for plates, utensils, towels, and grilling tools?
Step 2: Outdoor kitchen layout workflow—design it like a real kitchen
The biggest “silent mistake” in outdoor kitchen design is placing features based on looks rather than workflow. A beautiful island that forces you to carry raw food across the guest zone or blocks access to the grill becomes annoying fast.
The three outdoor work zones
- Cold / storage zone: fridge, cooler drawer, beverage storage, trash/recycling.
- Prep / wash zone: counter space, sink (optional), utensil storage.
- Hot / cooking zone: grill, side burner, pizza oven, smoker—plus heat-safe landing space.
Basic outdoor workflow (a homeowner-friendly sequence)
- Pull ingredients/drinks from the cold zone.
- Prep on a clean, comfortable counter near the cooktop.
- Cook at the hot zone with safe clearances and wind-aware placement.
- Plate/serve on a landing counter that isn’t blocked by people.
- Dispose of waste without crossing the entire space.
- Quick cleanup (sink or at least a water source nearby).
Design target: Keep “hot–prep–serve” within a few steps, and keep guests out of the hot zone. That’s how you get an outdoor kitchen that feels effortless.
Island shapes and what they’re good at
- Straight run: simplest utilities, best for small spaces, easiest to keep clean.
- L-shape: improves workflow by separating hot and prep zones, good for hosting.
- U-shape: best for serious cooking and serving, but needs enough space to avoid crowding.
- Galley (two parallel runs): can work well if you have space; requires careful clearance planning.
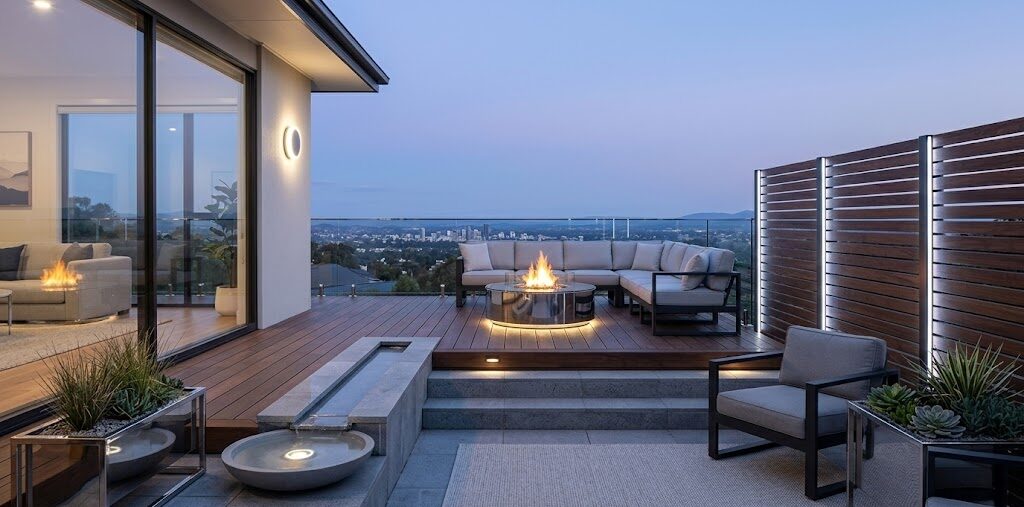
Step 3: Plan placement for sun, wind, and smoke (Utah comfort realities)
Utah is bright. Sun exposure makes surfaces hot and turns “great on paper” seating into “nobody sits there.” Wind exposure affects smoke, flames, and comfort. Outdoor kitchens are more enjoyable when you place them intentionally instead of defaulting to “centered on the patio.”
Placement checklist
- Sun: Where is afternoon sun (usually the harshest)? Do you need cover, pergola, or shade planning?
- Wind: Does wind commonly blow across your yard? Will smoke blow toward seating or back into the home?
- Distance from the indoor kitchen: Too far becomes inconvenient; too close can create smoke issues near doors/windows.
- Traffic: Can people move from inside to outside without crossing the cooking zone?
- Storage access: Can you get to grill tools and serving items without opening doors into walkways?
If you’re also deciding whether the foundation should be a deck, patio, or covered space, review Deck vs. Patio vs. Covered Space first. The platform choice affects utilities, durability, and how you manage snow and water.
Step 4: Outdoor kitchen utilities—gas, electric, water, and drainage
This is the core of outdoor kitchen utilities gas electric water. When utilities are planned early, your appliance options stay open and your finished kitchen looks clean. When utilities are an afterthought, you end up with exposed conduit, awkward hose solutions, or appliances that don’t match your goals.
Utilities “must decide” list:
- Gas: natural gas line vs propane storage, appliance BTU needs, shutoff access.
- Electric: outlets, lighting, fridge circuit, ignition power, future-proofing.
- Water: sink supply, freeze protection, shutoffs, backflow considerations where applicable.
- Drainage: where water goes, how to avoid ponding, and how to prevent winter issues.
Gas planning: natural gas vs propane (homeowner-friendly comparison)
- Natural gas: continuous supply, no refills, great for frequent use. Requires proper line sizing, shutoffs, and code-compliant installation.
- Propane: flexible for location, but requires storage planning and refills. Can be great when gas tie-in is difficult.
Safety note: Gas work should be done by qualified professionals. Requirements and inspection expectations vary by jurisdiction—confirm with your local building department and licensed trades.
Electric planning: outlets and lighting are not “extras”
Outdoor kitchens feel unfinished without enough power. Even simple setups benefit from planned outlets and lighting because you’ll use the space at night and you’ll eventually add something you didn’t anticipate (string lights, a warmer, a mini fridge, a TV, or phone charging).
- Outlets: plan where you’ll plug in prep tools, music, warming trays, or a blender.
- Dedicated circuits: refrigerators, ice makers, or larger appliances may need dedicated power planning.
- Task lighting: grilling in the dark is the fastest way to stop using the kitchen.
- Ambient lighting: makes the space feel inviting instead of “worksite bright.”
For how disciplined planning prevents rework (especially when multiple trades are involved), see Whole-Home Remodel Sequencing.
Water planning: sinks are great—but Utah winters require a plan
A sink changes how functional an outdoor kitchen feels. It also introduces freeze risk. If you add water, you need a winterization strategy and a clear plan for shutoffs and drainage.
- Shutoff access: you need a way to shut water off seasonally if required by your design.
- Freeze protection: insulation and placement matter; details vary by climate and product.
- Hot water: optional, but improves usability. Adds planning complexity.
Drainage planning: the hidden durability factor
Freeze–thaw durability is mostly about water management. Water that sits in the wrong place (behind panels, under cabinets, on surfaces) creates problems over time. Proper slope, clear drainage paths, and sensible detailing reduce risk.
Utah durability reality: If water can get in, it eventually will. Good outdoor kitchens are designed so water can also get out—and not get trapped.
Step 5: Appliance considerations (what changes the plan)
Appliances drive utility needs, clearances, ventilation behavior, and storage layout. Choose your “anchors” early (grill type, pizza oven, fridge, sink) so everything else can be designed around real dimensions and requirements.
Grills and cooktops: plan safe landing space
- Include heat-safe counter space near the grill for trays and tools.
- Keep combustibles and seating a safe distance from the hot zone.
- Plan for grease management and easy cleaning access.
Refrigeration: it’s the upgrade most homeowners use more than they expect
A beverage fridge or undercounter fridge reduces trips inside and keeps guests out of your indoor kitchen. It also requires more serious electrical planning than most people realize.
Pizza ovens: awesome, but they change workflow
- They take space and require a safe landing zone.
- They generate heat—plan placement so guests aren’t clustered near the hot zone.
- They can influence cover structure design due to heat and venting needs (product-specific).
Storage: don’t let “pretty” cabinets create daily frustration
Outdoor storage needs to resist moisture, handle temperature swings, and stay functional even when the environment is dusty or windy. The goal is storage you actually use without worrying about warped doors or rusted hardware.
Step 6: Weatherproof outdoor kitchen materials (what holds up in Utah)
“Weatherproof” is not a single material. It’s a system: structure, surfaces, moisture management, and details that anticipate wind-driven rain, snow melt, UV exposure, and seasonal movement.
Freeze–thaw outdoor kitchen durability: what to prioritize
- Non-porous or low-porosity surfaces where possible (to reduce water absorption).
- Stable substrate and base prep (movement cracks finishes and loosens joints).
- Proper slope and drainage so water doesn’t pond behind/under cabinets.
- Quality detailing at seams and penetrations (utilities are the most common leak pathways).
Countertops: durability first, then aesthetics
Outdoor counters deal with sun, temperature swings, spills, and freeze–thaw risk. Choose based on how you’ll use and maintain them—not just the showroom look.
- Heat resistance: can you place hot items down without damage?
- Stain resistance: oils, sauces, and drinks will happen.
- UV stability: some finishes can fade in intense sun.
- Maintenance: will you actually keep up with sealing if required?
If you’re comparing countertop durability and maintenance mindsets, the same logic applies indoors. See Quartz vs. Granite vs. Porcelain Countertops for a homeowner-friendly comparison framework (and then apply it outdoors with weather exposure in mind).
Cabinetry and doors: moisture resistance and hardware quality matter
- Use materials designed for outdoor exposure (or systems specifically rated for it).
- Prioritize corrosion-resistant hardware and hinges.
- Plan ventilation around enclosed areas to avoid trapped moisture.
Backsplashes and wall finishes: easy-clean wins
Grease, smoke, and weather exposure make “fussy” materials harder to maintain outside. The best choices are often the ones you can wipe down quickly without special routines.
Step 7: Integrate the kitchen into the bigger outdoor living plan
A standalone outdoor kitchen can work. But the best ones feel like they belong—connected to seating, shade, and circulation. That integration starts with the platform and cover strategy.
Deck vs patio decisions affect everything
If you haven’t chosen the platform yet, review Deck vs. Patio vs. Covered Space. Your choice influences:
- how utilities are routed and protected,
- how you manage drainage and snow melt,
- how stable the kitchen base will be over time,
- and how the space feels (elevated view vs yard connection).
Cover and comfort upgrades (the “use it more months” strategy)
- Cover structure: improves comfort and protects finishes.
- Lighting: turns the space into an evening destination.
- Fans/heaters: optional, but can extend usability.
- Wind control: partial screens or privacy walls can help (design-dependent).
To explore how Fortress approaches Utah outdoor projects end-to-end, see Outdoor Living Spaces Designed for Utah Living.
Maintenance checklist: keep it looking good without making it a chore
Outdoor kitchens stay enjoyable when maintenance is realistic. That starts with material choices, but it also includes a simple routine.
Seasonal maintenance checklist (homeowner-friendly):
- Weekly (during peak use): wipe counters, clean grill exterior surfaces, empty trash, quick check for spills.
- Monthly: deep clean grill grates, wipe cabinet interiors, check hinges/handles, inspect for moisture traps.
- Before winter: follow manufacturer guidance for appliances; confirm water shutoff/winterization plan if you have a sink; remove/cover items that shouldn’t freeze.
- Spring restart: inspect caulks/seams (if applicable), test outlets/lighting, clean vents and screens, check for any winter movement or drainage issues.
Important: Winterization needs vary by product and installation design. Always follow manufacturer instructions and confirm best practices with qualified professionals.
Common outdoor kitchen planning mistakes (and how to avoid them)
Mistake 1: Designing for looks first, workflow second
Fix it by defining hot/prep/serve zones and planning guest circulation so people aren’t standing in your cooking zone.
Mistake 2: Skipping utility planning until after the slab/deck is built
Fix it by creating a utility map early—gas, electric, water, and drainage—before hardscape. This is the most common driver of expensive “why did we do it this way?” regrets.
Mistake 3: Underestimating sun and wind
Fix it by choosing placement and cover strategy based on actual site conditions. Utah’s sun and seasonal wind patterns should inform layout.
Mistake 4: Choosing materials that can’t handle freeze–thaw or UV exposure
Fix it by prioritizing low-maintenance, durable systems and paying attention to water management details—especially around seams and penetrations.
Mistake 5: Not planning storage and cleanup
Fix it by adding practical storage (tools, towels, serving) and deciding early whether you need a sink or a nearby water strategy.
Conclusion: build the utilities plan first, then make it beautiful
An outdoor kitchen can be one of the best upgrades you make—especially in Utah where outdoor seasons are worth enjoying. The key is to plan it like a real kitchen and build it like a weather-exposed system.
When utilities are planned early, workflow is prioritized, and materials are chosen for freeze–thaw durability, you get a space that feels effortless—and stays that way for years.
Want an outdoor kitchen plan that works with Utah weather and real utilities?
The Fortress Builders designs and builds outdoor living projects with disciplined planning, durable structure, and clean execution—so your outdoor kitchen feels intentional, comfortable, and built to last.
Request a Design Consult Explore Outdoor Living Services Deck vs Patio Guide
If you can, bring: (1) a few photos of your yard, (2) your “must-have” appliances list, and (3) a rough idea of where you want guests to sit vs where you want to cook. We’ll help translate that into a durable plan.