
Kitchen layout measurement guide for remodel: how to measure for design and quotes
Kitchen Layout Measurement Guide: How to Measure for Design and Quotes
If you’ve ever tried to compare kitchen remodel quotes and felt like you were comparing apples to oranges, you’re not alone. A big part of the confusion comes from one thing: incomplete measurements. When the measurements are consistent, designers can draw accurately, cabinet plans fit the real room, and quotes become far easier to trust.
Helpful Fortress links to keep open while you measure:
Measure once, plan smarter: why accurate kitchen measurements save real money
A well-planned kitchen remodel saves time, money, and daily frustration—and measurements are the foundation. When measurements are incomplete (or taken in the wrong order), you end up with:
- Cabinet plans that don’t fit real walls
- Appliance openings that don’t match the models you buy
- Walkways that feel cramped once the island and stools are in
- Change orders for electrical, plumbing, and venting that “weren’t shown”
- Quotes that vary wildly because each contractor assumed different conditions
What this guide gives you: a homeowner-friendly measurement workflow you can do in one afternoon, plus a checklist of the exact dimensions designers and builders use to create plans and accurate quotes.
Before you start: tools, prep, and the “don’t guess” rule
What you’ll need
- Tape measure (25 ft is usually enough)
- Notepad or graph paper (or print a blank grid sheet)
- Pencil + eraser (you’ll revise)
- Camera/phone (photos help designers verify details)
- Step ladder (for upper measurements if needed)
- Optional: laser measure (nice for long walls, not required)
The “don’t guess” rule
If something is unclear—measure again. Designers can work with imperfect drawings, but not with invented numbers. You’re building a reliable “as-is” snapshot, not a perfect architectural plan.
Quick safety / scope note
If you plan to move walls, plumbing, electrical, or ventilation, requirements can vary by jurisdiction and project details. Confirm specifics with qualified professionals and local authorities before demolition.
Step 1: clarify goals before measuring (so you measure what matters)
It sounds backwards, but goals affect what you must capture. For example, if you want an island, you need walkway widths. If you want a pantry upgrade, you need depth and door swing space. Start with a quick goal check:
- Function problems: What annoys you daily—traffic jams, lack of prep space, not enough storage, poor lighting?
- Layout direction: Are you staying close to the current layout or considering a rework?
- Must-haves: Island seating? Bigger pantry? Wall ovens? Range hood upgrade? Beverage zone?
- Budget reality: Do you want “best value,” “mid-tier,” or “premium” finishes?
For a structured start, use the Kitchen Remodel Planning Checklist.
Step 2: draw a simple floor plan (you’re creating a measurement map)
You don’t need perfection. You need a consistent sketch that matches the room’s shape. Here’s how to do it:
Start with the perimeter
- Sketch the outline of the kitchen walls as a simple shape (rectangle, L-shape, etc.).
- Mark where the kitchen connects to adjacent rooms (openings, hallways, doorways).
- Choose one corner as your “starting corner” and label it (A).
Use one measurement direction
Pick a direction (clockwise or counterclockwise) and measure each wall segment in order. This prevents missing segments and helps others “walk” your plan.
Tip: Always measure wall-to-wall along the base (near the floor). Upper cabinets, windows, and soffits can change, but the floor footprint is your anchor.
Step 3: measure the room perimeter (the non-negotiables)
What to record for each wall
- Total wall length (corner to corner)
- Any “bumps” or jogs (chases, columns, bump-outs)
- Doorways/openings and their widths
- Adjacent room labels (Dining, Living, Hall)
How to measure openings
Measure the clear opening width (trim-to-trim), and if there’s a door, record:
- Door width
- Swing direction (left/right, in/out)
- Any obstructions near the swing (radiators, vents, cabinets)
Step 4: measure windows and doors (location matters more than size)
Designers primarily need to know where openings sit on the wall, not just their size.
For each window, record:
- Distance from left corner to window trim (left edge)
- Window width (trim-to-trim)
- Distance from window trim (right edge) to right corner
- Height from floor to sill
- Height from sill to top trim (or total height)
For each door, record:
- Distance from corner to door trim (left edge)
- Door width (trim-to-trim)
- Door swing and clearance issues
- Threshold height change (if any)
Step 5: measure ceiling height, soffits, and bulkheads (the “why won’t the cabinets fit?” section)
Cabinet height decisions depend on ceiling height and soffit conditions. Record:
- Ceiling height in multiple spots (older homes can vary)
- Soffit locations and depth (how far they come out from the wall)
- Bulkheads or beams that affect cabinet runs
- Anything that creates a “cabinet height limit”
Quick method
Measure from floor to ceiling at two corners and one mid-wall spot. If they differ, record all values.
Step 6: measure existing cabinets and counters (if you’re keeping any, or comparing layouts)
If you’re replacing everything, you don’t need every cabinet dimension—but you do want to understand what currently works and what doesn’t. Record:
- Counter height (floor to top)
- Counter depth (wall to front edge)
- Upper cabinet height + depth (if present)
- Toe-kick height (optional, but helpful)
Why this matters
Small differences in depth and height affect comfort, reach, and appliance alignment. It also impacts whether you can add features like deeper pantry cabinets or a larger sink base.
Step 7: capture appliance locations + sizes (this is how quotes become comparable)
Appliances drive layouts. If a quote assumes a 30" range and you later buy a 36" range, everything shifts: cabinets, venting, electrical, and sometimes structural framing. Record:
For each appliance, note:
- Brand/model if known (best)
- Width and depth of the current unit
- Where the unit sits on the wall (distance from corners)
- Any special needs (gas line, dedicated circuit, water line, vent)
Built-ins and panel-ready appliances
If you’re considering built-in or panel-ready units, review Built-In Appliances: Layout Tips for Fridges, Wall Ovens, and Microwaves early. These choices affect cabinet construction, filler panels, door swings, and clearances.
Pro move: Even if you don’t know the model yet, decide “size class” now (30 vs 36 range, counter-depth vs standard fridge, single vs double oven). This makes design and quotes far more accurate.
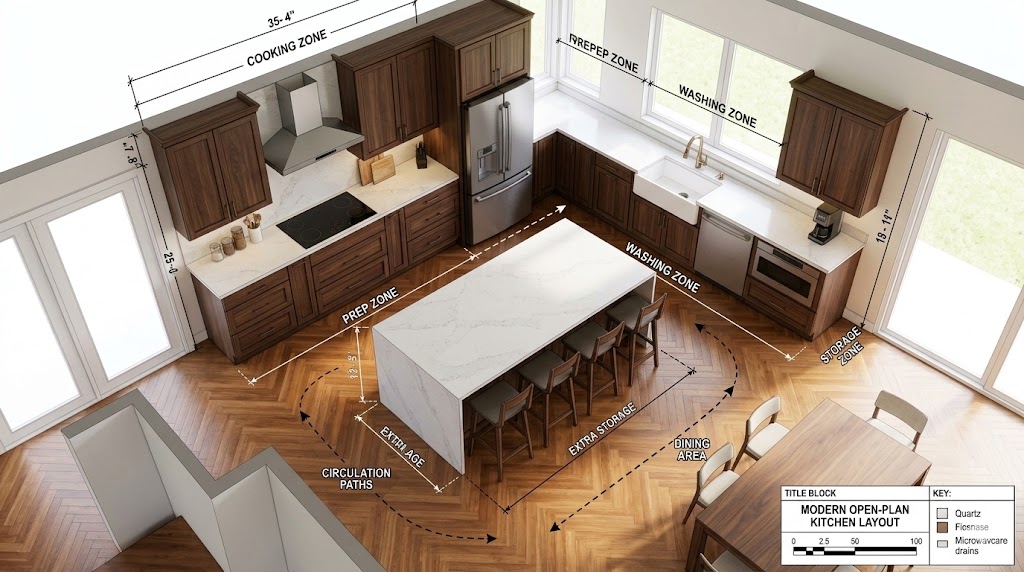
Step 8: measure clearances and circulation (where good kitchens are won or lost)
Clearances are what make a kitchen feel “easy” or “tight.” Before you finalize a layout, you want enough data to check:
- Walkways (especially around islands and between counters)
- Door swings (fridge, oven, dishwasher)
- Seating space (stools pulled out)
- Traffic routes (paths to pantry, fridge, dining, back door)
Island planning
If an island is a possibility, use the measurement logic in the Kitchen Island Size Guide: Clearances, Seating, and Storage. The key is not just island size—it’s the space around it.
Work zones vs triangle
To avoid “kitchen as hallway” designs, revisit Work Triangle vs. Work Zones and measure the paths between prep, cooking, and cleanup.
Step 9: capture plumbing, electrical, and ventilation “markers” (even if you’re not moving them)
You don’t need to open walls to be helpful here. The goal is to give your designer/builder a sense of constraints and opportunities.
Plumbing markers
- Sink location (distance from corners)
- Any secondary sinks (bar sink, prep sink)
- Dishwasher location
- Water line for fridge (if present)
Electrical markers
- Where outlets currently are (especially along backsplash areas)
- Where lighting is controlled (switch locations)
- Any dedicated circuits you know about (range, ovens, microwave, etc.)
Ventilation markers
- Where the range/cooktop is
- Whether a hood vents outside or recirculates (if known)
- Any visible duct chases or soffits that relate to venting
Note: electrical and ventilation requirements vary by jurisdiction and project scope. Confirm specifics with qualified professionals and local authorities before construction begins.
If you’re upgrading lighting and power, see Kitchen Lighting & Electrical Designed for Real Life.
Step 10: plan storage zones (so measurements support real routines)
Measurements are only useful when they support decisions. Before you finalize cabinet plans, define your storage zones:
- Prep zone: tools, bowls, knives, cutting boards near the main prep counter
- Cooking zone: pans, utensils, spices, oils near cooktop/oven
- Clean-up zone: dishes near dishwasher, trash/recycling near sink
- Pantry zone: food staples, snacks, small appliances
Pantry choice is often the make-or-break decision for clutter control. Use Pantry Design Ideas: Walk-In vs. Cabinet Pantry vs. Butler’s Pantry to pick the right type for your footprint and habits.
What to send a designer or builder (so quotes become apples-to-apples)
If you want accurate design and comparable quotes, package your information like this:
- 1) Your floor plan sketch (with wall lengths and openings located)
- 2) Photos of each wall (stand back; include corners and openings)
- 3) Ceiling height + soffit/bulkhead notes
- 4) Appliance list (sizes, notes, model numbers if known)
- 5) “Must keep / must change” list (what you like and hate)
- 6) Goals and priorities (storage, seating, cooking style, hosting)
Common measurement mistakes (and how to avoid them)
Mistake 1: measuring only total walls (without locating openings)
Design needs locations—corner-to-opening distances—so cabinets and appliances fit realistically.
Mistake 2: ignoring door swings and appliance doors
A layout can “fit on paper” and still collide in real life. Always note door swings and check clearances.
Mistake 3: forgetting ceiling height changes and soffits
Soffits and bulkheads are where cabinet plans go to die. Record them early so you don’t design cabinets you can’t install.
Mistake 4: skipping traffic flow
Good kitchens protect work zones from through-traffic. Use work zones thinking and measure circulation paths.
Mistake 5: deciding appliances after cabinets
Appliances drive dimensions, clearances, and sometimes electrical/ventilation changes. Lock “size class” early.
Mini checklist: measurement workflow you can follow in order
- Sketch room shape + label corners
- Measure each wall segment in one direction (clockwise)
- Locate doors and openings (corner-to-trim distances)
- Locate windows (corner-to-trim, sill height, total size)
- Measure ceiling heights + soffit/bulkhead locations
- Record appliance sizes + positions
- Measure clearances and circulation paths
- Mark plumbing/electrical/vent “anchors” (sink, range, outlets)
- Photograph each wall from multiple angles
Conclusion: measure like a pro, then get a second set of eyes before you commit
Accurate measurements don’t just help a designer draw a prettier plan—they help you avoid the expensive version of “close enough.” When your room perimeter, openings, ceiling conditions, and appliance needs are captured correctly, you can:
- Make layout choices with confidence
- Compare quotes more fairly
- Reduce change orders and timeline surprises
- End up with a kitchen that works in real life—not just in a rendering
Want a second set of eyes on your measurements and layout before you order?
Fortress Builders can review your kitchen layout, storage zones, clearances, and appliance strategy so your design is buildable and your quotes are grounded.
Request a Design Consult Explore Kitchen Remodeling View Kitchen Portfolio
For a structured start, use the Kitchen Remodel Planning Checklist before demo or ordering.