
Tub-to-Shower Conversion: Cost Drivers, Design Options, and Resale Value
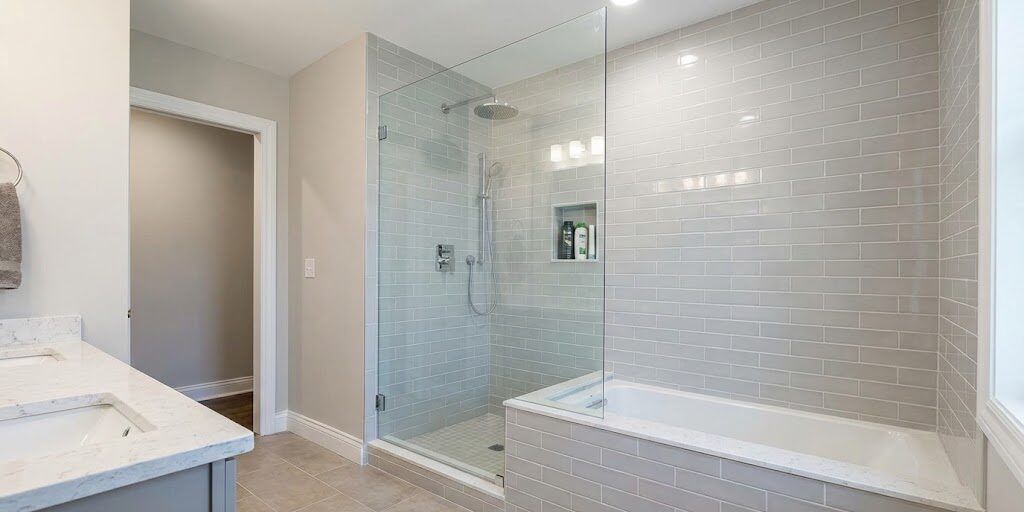
Tub-to-Shower Conversion: Cost Drivers, Design Options, and Resale Value
Conversions can be a smart upgrade—when done right.
A tub-to-shower conversion looks simple on paper: remove the bathtub, install a walk-in shower, enjoy the extra convenience. In reality, the best conversions succeed because they treat the shower as a system—not just a new finish. Waterproofing, drainage, ventilation, and glass layout all matter as much as the tile you choose.
This homeowner-friendly guide covers:
- Why homeowners choose a tub to shower conversion (and when keeping a tub makes sense)
- The biggest tub to shower cost drivers—what actually increases scope
- Design options that impact comfort, cleaning, and long-term durability
- Waterproofing tub conversion basics: what “built to last” really means behind tile
- Shower glass cost factors and how to choose an enclosure that works with your layout
- Walk in shower conversion resale considerations so you don’t unintentionally unbalance the home
- A planning checklist you can use before demo starts
The Fortress Builders is a Utah design–build company built on one principle: strength through structure. We plan the systems behind the finishes—layout, waterproofing, ventilation, electrical, and plumbing—so the final bathroom looks great on day one and performs for years.
Related internal resources while you plan:
- Bathroom Remodeling in Utah: Built to Last
- Why Walk-In Showers Are Taking Over Home Remodeling
- Tile & Waterproofing Systems Built for Longevity
- Bathroom Ventilation & Moisture Control Done Right
- Request a Design Consult
Important note: Plumbing, waterproofing, ventilation, electrical, and permitting/inspection requirements can vary by jurisdiction and project scope. Always confirm details with qualified professionals and local authorities, and follow manufacturer instructions for every shower system component.
A tub-to-shower conversion is more than a swap—it’s a full shower build in disguise
Many homeowners start with a simple goal: “We don’t use the tub. We want a shower.” That’s totally reasonable. But a conversion touches multiple parts of the bathroom assembly:
- the plumbing rough-in (drain location, valve depth, supply lines),
- the wet-area build (slope, waterproofing membrane, backer/substrate),
- the wall system (blocking for glass, niches, grab bars),
- the floor transitions (curb height, curbless details, adjacent flooring),
- and the room’s moisture strategy (ventilation and drying).
Big idea: If you treat a tub-to-shower conversion like a cosmetic change, you risk building a shower that looks good but fails early. If you treat it like a proper shower build—with real waterproofing and a coordinated plan—you get a long-lasting upgrade that feels better every day.
What homeowners usually want out of the conversion
Most conversion goals fall into a few categories:
- Ease of use: stepping into a shower is easier than stepping over a tub wall.
- Less cleaning: fewer corners, fewer ledges, fewer mildew traps.
- More visual space: glass can make a bathroom feel larger and brighter.
- Modern style: updated tile, fixtures, and layout can refresh the whole room.
- Better daily routines: storage that works, lighting that flatters, a shower that feels good.
Those are all valid—and they’re all achievable. The difference between “good” and “great” is planning.
When a tub-to-shower conversion makes sense (and when it might not)
A tub-to-shower conversion can be a smart move, but it’s not automatically the right move for every home. Here’s how to think about it without guesswork.
Conversions tend to make the most sense when…
- You rarely or never take baths and the tub is basically unused square footage.
- Stepping over a tub wall is uncomfortable, risky, or simply annoying.
- You want a more accessible bathroom (now or as a future-friendly upgrade).
- Your existing tub/shower surround has maintenance problems (leaks, cracked tile, mold pressure).
- You want a shower that is easier to clean and easier to use daily.
You may want to pause (or plan differently) if…
- This is the only tub in the entire home and your household uses baths (kids, recovery, personal preference).
- You’re planning for broad resale appeal in a market where families strongly prefer at least one tub.
- The bathroom is extremely small and a poorly planned shower enclosure could make it feel cramped or awkward.
- You want a curbless shower but your existing structure makes it complex (still possible in many cases, but it’s a design challenge that needs the right approach).
A helpful question: “Are we removing the only tub in the home—or just converting one bath while keeping a tub elsewhere?”
- If you’ll still have a tub in another bathroom, conversions are often easier to justify from a resale perspective.
- If this is your only tub, you can still convert—but you should think about the tradeoffs intentionally.
If you’re exploring the “walk-in shower” direction more broadly, this page helps connect the design and durability dots: Why Walk-In Showers Are Taking Over Home Remodeling.
Tub to shower cost drivers: what actually moves the budget (and why)
Homeowners often search for a “price” for a tub-to-shower conversion, but the honest answer is: the cost depends on scope and conditions. A conversion can range from relatively straightforward to highly customized.
Instead of guessing numbers, use this section as a scope map. These are the choices and conditions that tend to increase labor, materials, and coordination.
Cost driver #1: plumbing changes (especially drain location)
Plumbing is one of the biggest tub to shower cost drivers because tubs and showers don’t always want the drain in the same spot.
- Many tubs drain at one end.
- Many showers are designed around a centered or specific drain location (depending on the shower base or slope design).
If the drain can stay where it is, that often reduces complexity. If the drain needs to move, the scope increases—especially if access is difficult.
Cost driver #2: slab vs. framed floor conditions
Access conditions matter. Moving a drain line or adjusting plumbing is very different depending on what’s under the bathroom:
- Framed floors: Plumbing changes may be accessible from below (sometimes through a basement or crawl space) or by opening ceilings/walls.
- Concrete slabs: Drain changes can require more invasive access methods. This doesn’t mean “don’t do it,” but it’s a real scope factor.
Cost driver #3: shower base choice (prefab pan vs. tiled base)
There are multiple ways to build the shower floor, and each has design and scope implications:
- Prefabricated shower pans: Often quicker to install, fewer grout lines, and can be a solid option for many conversions. The key is selecting a pan that fits the space and drain location and integrating waterproofing correctly.
- Tiled shower floors: Can look beautiful and allow more flexibility in size and drain placement, but require careful slope, waterproofing, and tile selection—especially for slip resistance.
Homeowner note: Neither option is “automatically better.” The best choice depends on your layout, your style goals, and your maintenance tolerance.
Cost driver #4: tile complexity and material selection
Tile costs aren’t just about the tile itself. Complexity can increase labor and timeline:
- Large-format tile can look modern and reduce grout lines, but requires flatter walls and careful layout planning.
- Small mosaics add detail but often increase grout maintenance and installation time.
- Patterns (herringbone, chevron) require more cuts and layout precision.
- Accent bands and multiple material transitions add labor and detailing.
If you’re thinking about tile choices with maintenance in mind, this resource helps: Choosing Bathroom Tile: Slip Resistance, Grout Lines, and Maintenance.
Cost driver #5: waterproofing method and detailing (where quality is non-negotiable)
Waterproofing is not the place to “value engineer” by skipping steps. The right waterproofing system and correct installation protects the framing behind tile and reduces long-term risk.
Waterproofing isn’t a line item you want minimized—it’s a system you want done correctly. For a homeowner-friendly breakdown, see: Bathroom Waterproofing 101: What’s Behind Great Tile Work.
Cost driver #6: shower glass cost factors (often bigger than people expect)
Glass is a major driver because “a glass door” can mean many different things:
- Standard vs. custom sizing: A custom panel or door sized to your exact opening often costs more than a standard off-the-shelf enclosure.
- Thickness and hardware: Heavy glass and premium hinges/handles increase cost.
- Door type: Pivot/hinged doors, sliders, and fixed panels have different hardware and layout requirements.
- Coatings and maintenance features: Some glass options include coatings designed to reduce spotting (results depend on water conditions and cleaning habits).
- Layout complexity: Neo-angle, corner openings, and multiple panels add complexity.
Cost driver #7: niches, benches, shelves, and “extras” that add daily function
One of the biggest value opportunities in a conversion is storage that actually works—because the shower is where clutter loves to collect.
But storage adds detailing and waterproofing complexity. A niche or bench done correctly is absolutely worth it. Done incorrectly, it becomes a leak risk. This guide helps you plan shower storage that doesn’t leak: Shower Niches, Benches, and Shelves: Storage That Doesn’t Leak.
Cost driver #8: ventilation, electrical, and lighting upgrades
Converting a tub to a shower can change how humidity behaves—especially if you’re building a more open, steamy shower experience. Ventilation is what protects the rest of the bathroom: paint, trim, cabinetry, mirrors, and ceilings.
Vent fan sizing, duct routing, and controls are often overlooked. If you want to prevent moisture issues long-term, start here:
- Bathroom Vent Fan Sizing: How to Control Humidity and Odors
- Bathroom Ventilation & Moisture Control Done Right
- Mold Prevention in a Bathroom Remodel: Design + Ventilation Basics
| Conversion Decision | Why It Impacts Cost | What Homeowners Should Decide Early |
|---|---|---|
| Drain location changes | More plumbing work + access complexity | Do you want a centered drain / specific pan? Can the drain stay put? |
| Slab vs framed floor | Access method changes the scope of plumbing work | What’s under the bath? Is there access from below? |
| Prefab pan vs tile base | Different materials + labor + detailing | Do you prefer fewer grout lines or custom sizing/design? |
| Waterproofing system choice | Quality system + correct detailing is essential | What system is used and how are seams/penetrations handled? |
| Glass enclosure type | Custom glass, hardware, and layout complexity add up | Door swing? Slider? Fixed panel? How open do you want it? |
| Niches/benches/storage | More waterproofing details and labor | Where will bottles go? Is storage sloped and waterproofed? |
| Ventilation & electrical upgrades | Fan, ducting, lighting, and controls add scope | Do you want a timer/humidity sensor? Better shower lighting? |
Permits and inspections: don’t skip the boring part
Conversions sometimes involve plumbing changes (valves, drains, venting) and sometimes electrical changes (fans, lighting, heated floors). Whether a permit is required depends on your local rules and project scope.
Important: Permitting and inspection requirements vary by jurisdiction. Confirm requirements with qualified professionals and local authorities early so the project sequence can be planned correctly.
Design options: what kind of walk-in shower are you actually building?
“Walk-in shower” can mean a lot of different design outcomes. In a tub-to-shower conversion, the best option usually depends on:
- bathroom size and layout,
- how much you want to change plumbing,
- how accessible you want the entry to be,
- and how you want the shower to feel day-to-day.
Option 1: A standard curb shower (often the simplest conversion path)
A curb shower uses a threshold (curb) to help contain water. In many conversions, a curb shower is the most straightforward approach because:
- it’s compatible with many shower pans and waterproofing strategies,
- it’s often easier to contain water (especially with glass),
- and it can be built cleanly in the footprint of a typical tub alcove.
That doesn’t mean it’s “basic.” A curb shower can be highly elevated with the right tile, glass, fixtures, and lighting plan.
Option 2: A curbless shower conversion (beautiful and accessible, but needs the right plan)
Curbless showers are popular because they can feel open and accessible. But curbless conversions require careful planning for:
- floor slope and drainage,
- waterproofing transitions,
- floor height changes and adjacent flooring,
- and water containment (especially in doorless designs).
If you’re considering curbless, this guide helps you weigh tradeoffs realistically: Curbless vs. Curb Shower: Which Walk-In Shower Is Right for You?.
Option 3: Doorless “wet room” style (high style, but water management is the whole game)
Doorless showers can look incredible, but they require strong water management planning:
- spray direction and showerhead placement matters,
- glass panel placement matters (even if there’s no door),
- floor slope and drainage matter more,
- and ventilation becomes even more important to dry the room.
Doorless can work beautifully—but it’s not always ideal for small bathrooms or households that take very hot, steamy showers back-to-back.
Option 4: Keep the tub, upgrade the shower experience instead
Some homeowners don’t actually need to remove the tub—they need the shower to feel better. Depending on layout and goals, it can sometimes make sense to:
- replace the tub with a better tub (or a deeper soaking tub),
- upgrade the shower valve and showerhead,
- improve waterproofing and tile,
- and upgrade lighting and ventilation.
If you love baths (or you want a bath option for guests/kids), it’s worth looking at tub upgrades as a different strategy: Bathtubs & Spa Upgrades: Built to Last.
Shower glass cost factors: choosing an enclosure that works in real life
Glass is one of the most important design decisions in a tub-to-shower conversion because it controls:
- how dry the rest of the bathroom stays,
- how easy the shower is to clean,
- how “open” the bathroom feels,
- and how accessible the shower entry is.
Common shower glass configurations (and what to think about)
1) Hinged/pivot door
- Pros: Clean look, wide opening, feels premium.
- Watch-outs: Needs door swing clearance. If the door hits the toilet or vanity, it becomes annoying fast.
2) Sliding door
- Pros: Great for tight bathrooms because it doesn’t swing out.
- Watch-outs: Track cleaning can be a maintenance consideration depending on design.
3) Fixed panel (with or without a door)
- Pros: Simple, modern, fewer moving parts, can feel airy.
- Watch-outs: Water containment depends on layout. You may need a longer panel or different showerhead placement.
Practical rule: Choose shower glass based on your bathroom clearances first, your cleaning tolerance second, and the “look” third. If the door swing doesn’t work, the shower will be frustrating no matter how beautiful it is.
Safety note: glass requirements vary
Bathroom safety codes often require safety glazing (such as tempered glass) for shower enclosures. Exact requirements vary by jurisdiction and project details. Confirm glass specifications with qualified professionals and local authorities.
Waterproofing tub conversion: the behind-the-tile details that determine longevity
It’s worth repeating: tile is not waterproof. In a tub-to-shower conversion, you’re creating a wet environment that will see daily water exposure—especially at corners, seams, and penetrations.
That’s why waterproofing is the foundation. If you want the homeowner-friendly version of what a real shower system includes, start here: Bathroom Waterproofing 101: What’s Behind Great Tile Work.
The “conversion trap”: assuming the old tub surround was built correctly
One thing remodelers see often: the tub surround you’re removing may not have been waterproofed the way modern best practices require. Homeowners don’t always know because the shower “seemed fine” until it wasn’t.
When the walls are opened, you sometimes find:
- water damage behind tile,
- moldy insulation,
- soft framing or subfloor issues,
- or missing/incorrect water management details.
This isn’t meant to scare you—just to explain why conversions should include the right “behind-the-scenes” work when needed. Covering over damage is never the right long-term strategy.
What a durable shower waterproofing approach typically includes
Without getting overly technical, a durable shower system generally relies on:
- A stable substrate: appropriate backer in wet zones (not standard drywall where it doesn’t belong).
- A waterproofing membrane: sheet or liquid-applied, installed per manufacturer rules.
- Proper seam and corner detailing: corners and transitions are where failures start.
- Correct drain integration: the membrane must connect to the drain system correctly.
- Sloped surfaces: shower floors must drain; niches and benches should shed water too.
If you want to see the “built to last” lens Fortress applies to tile work, explore: Tile & Waterproofing Systems Built for Longevity.
Common waterproofing mistakes homeowners can avoid by asking better questions
You don’t need to manage the job like a contractor. But you can protect yourself by asking clear, homeowner-level questions:
- “What waterproofing system are you using behind the tile?”
- “How do you waterproof corners, seams, and plumbing penetrations?”
- “How do you handle niches and benches so water doesn’t sit?”
- “How is the waterproofing integrated with the drain?”
- “What’s the cure time before we use the shower?”
Homeowner takeaway: If the answer is basically “tile and grout seal it,” that’s a red flag. Tile is a finish, not the waterproofing system.
Storage and comfort upgrades: what makes the new shower feel “effortless”
Conversions can absolutely improve daily routines—but only if the new shower is designed for how you actually shower. Think beyond aesthetics and plan the “touch points.”
Niches vs. shelves vs. corner storage
Shower storage is where conversions often go wrong. Homeowners want bottles off the floor, but the shower ends up with:
- a niche that’s too small,
- a niche in the wrong place (awkward to reach),
- or a niche that becomes a grime trap because it doesn’t drain properly.
If you want storage that’s functional and durable, this guide is designed for you: Shower Niches, Benches, and Shelves: Storage That Doesn’t Leak.
Benches: comfort feature or maintenance feature?
Benches can be wonderful for:
- shaving,
- seated showering,
- or just a more spa-like feel.
But benches also create horizontal surfaces—meaning they need to be designed to shed water and detailed correctly.
Simple rule: If you add a bench, plan it like a wet surface first (slope + waterproofing) and a seat second.
Grab bars and future-friendly planning
Even if you don’t “need” grab bars now, many homeowners like to plan for future flexibility. The key is blocking and placement planning behind the wall before tile goes in.
Important: Accessibility requirements and best practices vary based on goals and jurisdiction. Work with qualified professionals to plan placement and installation correctly.
Handheld showerheads: one of the highest-value upgrades
A handheld showerhead can make a shower more usable for:
- kids,
- pets,
- cleaning the shower,
- and improved rinse control.
If you’re choosing shower fixtures and want to keep performance strong while using water wisely, this guide can help: Water-Efficient Bathroom Fixtures: Comfort, Performance, and Savings.
Ventilation is part of the conversion—whether you plan for it or not
When you replace a tub with a shower, you often increase how frequently the wet zone is used and how much steam is generated. Even if the shower itself is waterproofed perfectly, humidity can still damage:
- painted ceilings and walls,
- vanities and trim,
- mirrors and windows,
- and grout and caulk longevity.
What “good ventilation” feels like
In a well-ventilated bathroom:
- fog clears relatively quickly after showering,
- the room doesn’t stay damp for long,
- and musty odors don’t linger.
For a dedicated planning guide, start here: Bathroom Vent Fan Sizing: How to Control Humidity and Odors.
Controls matter (because fans only work when they run)
Most homeowners benefit from a simple control strategy:
- Timer switch: set it for 20–30 minutes and forget it.
- Humidity-sensing control: helpful when people forget to run the fan.
Want a balanced explanation of humidity sensors? See: Humidity-Sensing Bathroom Fans: Worth It or Just a Gadget?
Planning note: Electrical requirements vary. Confirm with a qualified electrician and local authorities when adding new fan circuits or controls.
Lighting and comfort: the easiest place to “level up” the conversion
A conversion is a perfect time to improve lighting—because walls and ceilings may already be opened for work. Bad lighting can make beautiful tile look dull and make routines harder.
Shower lighting: safety + comfort
Good shower lighting helps with:
- safer footing (especially for curbless designs),
- clear visibility for cleaning and daily use,
- and a more premium feel at night.
If you want a full lighting strategy, this guide is built for homeowners: Bathroom Lighting Plan: Vanity Sconces, Mirrors, and Overhead Lighting.
Pair lighting with mirror and vanity choices
Conversions often spark “while we’re in here…” upgrades. If you’re touching the shower, it’s smart to think about:
- mirror size and placement,
- vanity storage and counter space,
- and how the bathroom functions in morning routines.
Related guide: Small Bathroom Vanity Guide: Storage, Clearance, and Daily Comfort.
Walk in shower conversion resale: how to think about value without myths
Homeowners often ask: “Will converting the tub hurt resale?” The honest answer is: it depends on your home, your neighborhood, your buyer pool, and how many bathrooms/tubs the home has.
Instead of pretending there’s a universal rule, use these principles to make a smart decision.
Principle #1: Many buyers want at least one tub in the home
Families with young children often want a tub. Some buyers also prefer a tub for bathing, recovery, or personal comfort. That’s why the “keep at least one tub somewhere” strategy is often a safe planning move.
Principle #2: Walk-in showers are highly desirable—especially in primary suites
In many modern homes, a walk-in shower in the primary bathroom is a major plus. A well-designed, well-built shower can feel premium and elevate daily routines.
Principle #3: The bigger resale risk is an unbalanced bathroom
Resale issues often come from a conversion that creates a bathroom that feels awkward or incomplete, such as:
- a shower that leaks or looks poorly detailed,
- a shower door that hits the toilet,
- no storage, no niches, bottles on the floor,
- or a bathroom that feels dark and steamy because ventilation and lighting weren’t upgraded.
Resale takeaway: A tub-to-shower conversion built with strong waterproofing, good glass planning, and balanced design is typically more appealing than a dated tub surround. Quality and layout matter more than the “tub vs. shower” debate.
A simple resale decision framework
Use this as a quick gut-check:
- If this is your only full bathroom: think carefully before removing the only tub. If you convert, prioritize broad appeal and functionality.
- If you have multiple bathrooms: keeping one tub somewhere often preserves flexibility while still letting you upgrade another bath to a great shower.
- If you’re upgrading the primary suite: a premium walk-in shower is often a strong lifestyle and market-friendly move.
- If your household will live here for years: your daily comfort matters. A well-planned conversion can be worth it even if resale is a “maybe later” concern.
Common conversion mistakes (and how to spot them before you commit)
Most tub-to-shower regret comes from planning mistakes—not the idea itself. Here are the most common problems and how homeowners can avoid them.
Mistake #1: Choosing the shower glass last
Glass affects curb location, valve placement, and door swing. If you decide late, you can end up with awkward clearances or compromised layouts.
Mistake #2: Treating waterproofing as a “tile detail”
Waterproofing is the system behind tile. If there’s no clear waterproofing plan, the shower may fail early—even if the tile looks beautiful.
Mistake #3: Not planning shower storage
Without a niche or shelf plan, bottles end up on the floor or on a bench, which can create clutter and cleaning frustration. Storage should be planned and waterproofed correctly.
Mistake #4: Underestimating ventilation
Humidity doesn’t just disappear. If ventilation is weak, you may end up fighting foggy mirrors, musty smells, and mildew pressure—especially after a conversion that encourages more shower use.
Mistake #5: Choosing a curbless shower without a water containment plan
Curbless can be amazing, but it requires a clear strategy for slope, drain type, and glass placement—so water stays where it belongs.
What to expect during a tub-to-shower conversion (high-level timeline)
Every home is different, but most conversions follow a similar sequence. This helps homeowners understand why planning early matters.
1) Design + planning (before demolition is “done”)
- Choose shower style (curb vs curbless, door vs fixed panel, etc.).
- Confirm fixture plan (valve type, showerhead, handheld, etc.).
- Confirm storage plan (niche/shelf/bench).
- Confirm ventilation and lighting upgrades if needed.
- Confirm tile direction and layout decisions.
2) Demolition + inspection of existing conditions
- Remove tub and existing surround.
- Assess framing/substrate for moisture damage.
- Adjust scope if hidden damage is found (this is why contingency planning matters).
3) Rough-ins (plumbing, electrical, ventilation)
- Move/adjust drain and valve locations as needed.
- Install blocking for glass, grab bars, and accessories.
- Plan lighting and fan controls.
4) Shower system build (waterproofing + slope + prep)
- Install the chosen waterproofing system per manufacturer requirements.
- Confirm slope and drain integration.
- Perform required tests/inspections if applicable (rules vary by jurisdiction).
5) Tile + grout + cure time
Tile and setting materials need proper cure time. Turning on the shower too early or rushing can cause avoidable issues. Follow manufacturer and installer guidance.
6) Glass and final trim
- Install shower fixtures and trim.
- Install glass enclosure.
- Finish caulking and final details.
If you want a broader view of remodel phases and why sequencing matters, this resource is useful: Timeline and What to Expect.
Planning checklist: tub-to-shower conversion decisions to make before demo starts
If you want the conversion to feel seamless (and avoid rework), decide these items early—ideally before the plumbing rough-in is finalized.
Tub-to-shower conversion checklist (copy/paste friendly):
- Shower type: curb, curbless, or hybrid? Doorless or enclosed?
- Drain plan: can the drain stay where it is, or does it need to move?
- Shower base: prefabricated pan or tiled shower floor?
- Waterproofing system: which membrane/system is being used, and how are seams/penetrations handled?
- Shower glass: hinged, sliding, fixed panel, or combo? Confirm door swing and clearances.
- Storage: niche/shelf/bench plan and placement.
- Fixture layout: valve height, showerhead placement, handheld location, diverter if needed.
- Accessibility: curb height, grab bar blocking, bench, entry width.
- Tile decisions: wall tile size, grout lines, slip resistance for floors, maintenance tolerance.
- Ventilation: fan sizing, duct routing, and controls (timer/humidity sensor).
- Lighting: shower light, vanity light improvements, dimming strategy.
- Permits/inspections: what’s required locally for plumbing/electrical changes?
- Resale balance: will the home still have a tub somewhere if that matters to you?
Want to reduce delays and change orders? Plan sequencing early
Conversions often happen as part of a bigger bathroom refresh—or as part of a larger remodel. If your project touches more than one room, sequencing matters. This resource helps homeowners understand the order that reduces rework: Whole-Home Remodel Sequencing: The Order That Saves Time and Rework.
How Fortress Builders helps homeowners choose the right tub-to-shower strategy
At Fortress, “strength through structure” means we don’t just install what you can see—we plan what you can’t see so the shower works long-term.
For tub-to-shower conversions in Davis and Weber County, we help homeowners:
- evaluate whether converting is the best move for comfort and resale balance,
- choose a shower style (curb/curbless/glass layout) that fits the room,
- coordinate plumbing rough-ins and fixture selections early,
- build waterproofing and tile systems designed for longevity,
- plan ventilation and lighting so the bathroom stays dry and comfortable,
- and manage the project with clear communication from consult to final walkthrough.
Explore:
- Bathroom Remodeling in Utah: Built to Last
- Walk-In Shower Upgrades
- Tile & Waterproofing Systems Built for Longevity
- Bathroom Remodel Portfolio — Utah Homes
- Your Guide to a Seamless Remodel
Thinking about a tub-to-shower conversion?
Let’s choose the right shower strategy for your layout, your routines, and your long-term goals—then plan waterproofing, glass, ventilation, and fixtures the right way from the start.
Request a Design Consult Explore Bathroom Remodeling Walk-In Showers