
Living at home during a remodel: dust control, routines, and a plan that keeps life moving
Living at Home During a Remodel: How to Reduce Dust, Stress, and Disruption
Most homeowners don’t dread remodeling because they hate the idea of a new kitchen or better layout. They dread the middle: dust, noise, missing rooms, disrupted routines, and the feeling that the house isn’t yours for a while.
This guide is a practical, homeowner-first playbook for living through construction without losing your mind. The biggest theme is simple: you can’t stop dust and disruption completely—but you can plan around it so the experience stays livable.
In this guide, you’ll learn:
- how to set up containment zones and “clean paths,”
- what dust-control methods actually work during interior phases,
- how to protect HVAC, floors, and furniture from fine construction dust,
- how to plan temporary kitchens/baths so daily life continues,
- how to align your remodel timeline with realistic milestones,
- and the communication system that reduces stress more than any product.
The Fortress Builders is a Utah-based design–build company built on one principle: strength through structure. That includes process structure—clear phases, clear communication, and disciplined site management—so your remodel is not only beautiful, but manageable to live through.
Helpful planning links:
The goal isn’t “zero disruption”—it’s a home that stays livable while work gets done
Construction is inherently disruptive. Materials come in, walls open up, trades move through the home, and tools generate dust and noise. The difference between a remodel that feels manageable and one that feels miserable usually comes down to:
- Site zoning: where work happens vs. where life happens,
- Containment: how dust and debris are controlled,
- Communication: what you’ll know ahead of time (and what you won’t),
- Sequencing: how the project is staged to keep key functions available.
Homeowner reality check: Most “remodel stress” is not the work itself—it’s uncertainty. When you know what’s happening next week, you can plan your life around it.
Step 1: Set up “zones” (work zone, buffer zone, living zone)
Before interior work ramps up, your remodeler should help define three practical zones:
1) Work zone
The active construction area. This is where dust, noise, and trade traffic will be highest.
2) Buffer zone
A transition zone that reduces dust migration—often a hallway, stair landing, or mudroom where barriers and floor protection begin.
3) Living zone
Your “normal life” area: bedrooms, a bathroom, a living space, and ideally a clean route to exits.
Quick decision tip: If you can only protect one thing, protect sleep. A clean, quiet(ish) bedroom zone makes the entire remodel feel easier.
- Choose a bedroom farthest from demo/sawing when possible.
- Keep one bathroom as the “clean bathroom” if scope allows.
- Store daily essentials (meds, chargers, kids’ school items) in one bin you can move easily.
Step 2: Dust control comes first when the work moves inside
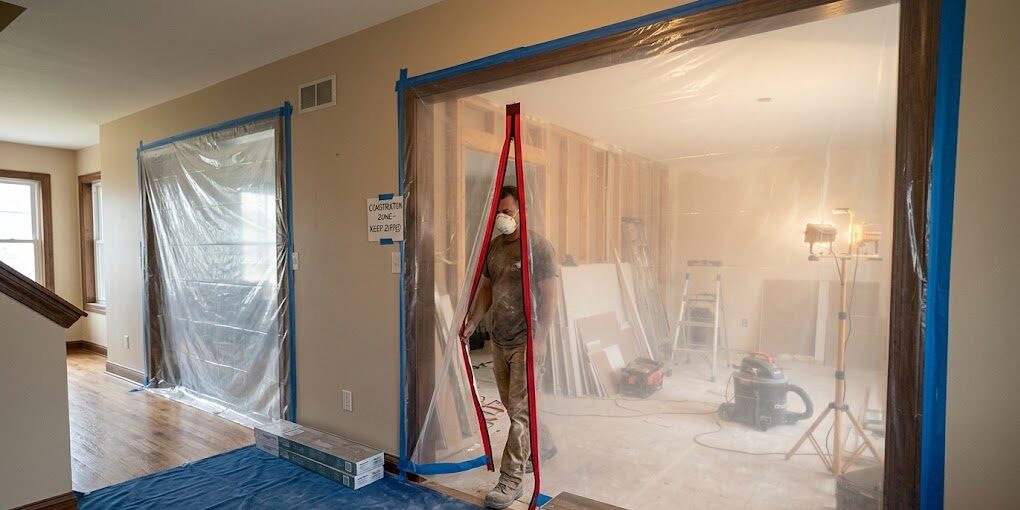
Dust isn’t just annoying—it impacts air quality, aggravates allergies, and makes your home feel constantly dirty. The good news: dust is manageable when the team treats containment as a first-class task, not an afterthought.
Containment basics that actually work
- Barrier walls: plastic sheeting systems that seal doorways and openings.
- Magnetic/zip doors: easy entry/exit while keeping the barrier closed.
- Taped edges: tight seals at the floor and trim to reduce leaks.
- Floor protection: runners, taped paper, or board protection in traffic lanes.
- Daily cleanup rhythm: end-of-day sweep/vacuum in the buffer zone.
The “clean path” concept
Pick one main path you’ll use every day—front door to bedrooms, garage to kitchen, etc.—and protect it like a hospital corridor:
- Cover floors in that path (and replace protection as needed).
- Keep doors closed to rooms outside the work zone.
- Store shoes/coats away from the buffer zone if possible.
- Ask your remodeler to keep tool staging and materials out of that path.
Dust control principle: Dust spreads when people and airflow move it. You control dust by controlling movement and sealing leaks.
HVAC + dust: protect your airflow system
Fine dust can be pulled into returns and distributed through the home. Strategies vary by system and scope, so confirm with qualified professionals, but common best practices include:
- Seal returns in the work zone during heavy dust phases (where appropriate and safe).
- Replace filters more often during construction.
- Maintain balanced airflow so the home stays comfortable.
- Coordinate ventilation planning early when ceilings and walls are open.
If your remodel includes basement finishing or new rooms, it helps to plan air strategy early. Related reading: Basement HVAC & Ventilation Planning.
Step 3: Build a “temporary living setup” (kitchen, bath, and routines)
If your kitchen or primary bath is out of commission, you need a realistic temporary setup. This is where homeowners often underestimate the stress of daily friction.
Temporary kitchen setup checklist
- Water: where will you fill bottles and wash dishes (utility sink, bathroom sink, laundry)?
- Cold storage: fridge access and a small cooler backup.
- Heat: microwave, toaster oven, induction plate, or grill plan.
- Food prep: a small folding table and cutting board station.
- Dish strategy: disposable plates for peak construction weeks (if needed), or a dedicated wash basin.
- Trash control: lidded bin to reduce dust and odors mixing.
If you’re doing a kitchen remodel, it helps to understand the planning sequence and what decisions reduce delays: Kitchen Remodel Planning Checklist and Built-In Appliances Planning.
Bathroom access plan
If you’ll have limited bathrooms, confirm:
- which bathroom stays operational throughout,
- when shutoffs will occur (and for how long),
- how ventilation will be maintained (especially during tile/waterproofing work),
- and how daily cleanup will be handled.
Related (especially useful if bathrooms are part of scope): Bathroom Vent Fan Sizing and Shower Waterproofing Explained.
Step 4: Noise, scheduling, and family routines
Noise is inevitable during demo, sawing, sanding, and flooring installation. The most homeowner-friendly projects manage noise through predictable work windows and proactive communication.
What to ask your remodeler about the weekly plan
- Which days are “loud days”? (demo, framing, sanding)
- What time does work start and end?
- When will utilities be interrupted? (water, power, HVAC)
- Which rooms will be inaccessible?
Family strategy: Plan errands, remote-work days offsite, or quiet activities for the loud phases. When you plan around noise, it feels temporary instead of constant.
Step 5: Protect finishes that stay (floors, stairs, furniture, and adjacent rooms)
In whole-home remodels, some surfaces stay while others change. Protection is not just about cleanliness—it’s about preventing damage that becomes expensive to fix later.
Protection practices to expect
- Hard floor protection: taped paper/board in main traffic lanes.
- Stair protection: runners or board coverage for repeated trade movement.
- Corner protection: tight hallways and turns need edge protection.
- Furniture relocation: move items out of buffer zones; use sealed storage where possible.
For broader “what to expect” milestones, see: Timeline and What to Expect.
Step 6: Sequencing reduces disruption more than any dust product
Dust barriers help, but sequencing is what keeps your home functional. If trades collide, timelines stretch, and you live in a construction zone longer than necessary.
Strong sequencing typically means:
- front-loading planning and selections,
- grouping dusty phases together,
- keeping one “clean zone” intact as long as possible,
- and minimizing back-and-forth work that reopens finished spaces.
If you want the clearest view of how pros minimize rework, start here: Whole-Home Remodel Sequencing.
Step 7: Communication system (the #1 stress reducer)
Even well-managed projects have surprises. What matters is how quickly the homeowner learns what changed and what it means.
A practical communication structure
- Weekly preview: what happens next week (trades, disruptions, access changes).
- Decision tracker: what you need to choose (with deadlines).
- Change awareness: any scope/sequence shifts explained in plain language.
- Daily site reset: what “clean enough” looks like at end-of-day.
If you’re selecting a contractor, this is one of the most important “process questions” to ask early. Related: How to Choose a Remodeler.
Step 8: Indoor air and comfort during construction
Comfort issues during a remodel often show up as:
- temperature swings (especially when doors are frequently opened),
- humidity spikes (tile, drywall mud, paint curing),
- stale air from reduced ventilation while barriers are up.
Specific recommendations depend on your home’s HVAC configuration and the work scope. If you’re adjusting layouts or finishing basements, it helps to plan supply/return balance early. Related: Basement HVAC & Ventilation Planning.
Step 9: What to do with pets and kids
Pets and small children change the risk profile. Open doorways, tools, sharp edges, and small debris can be unsafe.
Practical safety habits
- Barrier discipline: treat barriers like locked doors—don’t “peek” through active work zones.
- Daily floor sweep in living zones: especially near transition areas.
- Pet plan: define a safe room or consider daytime care during loud/dusty phases.
- Clear signage: a simple “work zone” visual cue helps kids remember boundaries.
Step 10: The interior-phase dust barrier (how it should look in practice)
When projects transition indoors, barriers are the difference between “construction is happening over there” and “construction is happening everywhere.” A well-defined work zone:
- has a clear entry/exit point,
- keeps doors closed where possible,
- uses reusable barriers when appropriate,
- and controls dust in the buffer zone daily.
Reality-based expectation: You will still clean more often than normal during a remodel. The goal is to keep cleaning localized and predictable—not constant across the entire home.
Common homeowner mistakes (and what to do instead)
Mistake 1: Not choosing a “clean zone” early
If every room becomes “kind of active,” the whole house feels unsettled. Pick protected rooms and keep them protected.
Mistake 2: Treating dust control as optional
Barrier systems and floor protection aren’t cosmetic. They protect health, comfort, and finishes. Ask how your remodeler handles containment before you start.
Mistake 3: Underestimating the emotional load of missing a kitchen
Temporary kitchens prevent daily life from feeling like an ongoing emergency. Set it up before demo day.
Mistake 4: No “next week” visibility
Weekly previews reduce stress more than perfect schedules. If your team can’t share what’s coming, you’ll feel behind the project instead of alongside it.
Mistake 5: Decisions made too late
Late finish selections create delays and rework. Use a decision tracker and confirm lead times early. Related: Budgeting for Your Remodel (because late changes often become budget surprises).
Conclusion: a livable remodel is built with planning, containment, and clear milestones
Living at home during a remodel can be done well—especially when the project is planned like a system. The most comfortable remodels aren’t “lucky.” They’re structured:
- zones are defined early,
- dust control is treated as a real scope item,
- temporary routines are built before demo,
- and communication stays predictable through each phase.
When those pieces are in place, the remodel stops feeling like chaos—and starts feeling like progress.
Need a remodel plan that keeps your home livable?
The Fortress Builders coordinates sequencing, site protection, and clear communication—so your remodel is built to last and built to live through.
Request a Design Consult Explore Remodeling Services View Portfolio
Bring your scope, constraints (kids/pets/work-from-home), and timeline goals. We’ll help map a realistic plan that protects your home and your routine.