
Home theater basics: screen wall placement, seating distance, and sightlines
A basement theater can be the most-used room in the house—or the room everyone avoids. The difference usually isn’t the projector brand or the speaker package. It’s whether comfort was designed into the room from the start.
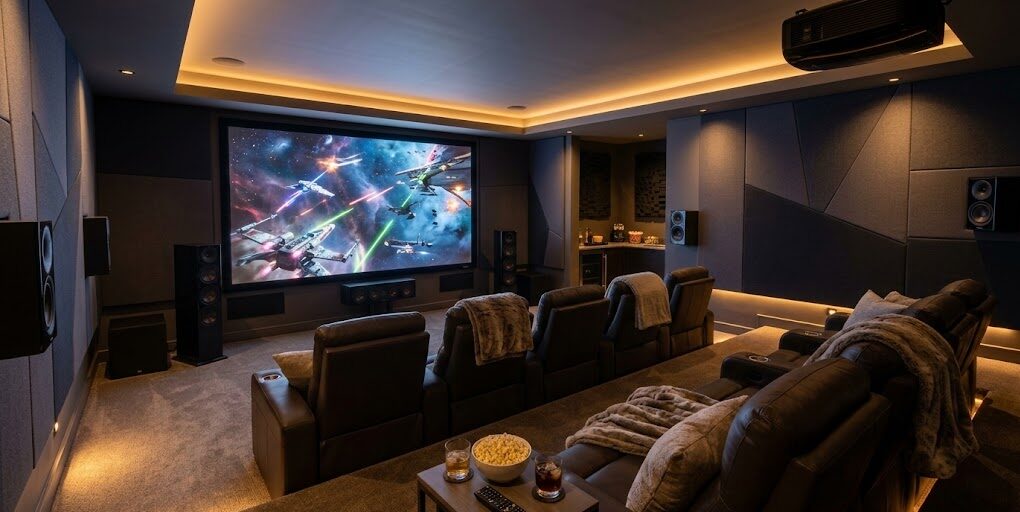
This guide covers home theater basics that make the room work for real viewing: screen wall placement, seating distance home theater planning, and home theater sightlines that keep every seat enjoyable.
In this guide, you’ll learn:
- how to choose a screen type and size that fits your room (not just your wishlist),
- how to plan the screen wall so wiring, speakers, and lighting don’t fight the design,
- how to set viewing distance and viewing angles for comfort,
- how to lay out seating and aisles so the room feels easy to use,
- when a riser makes sense (and what to consider before you build one),
- lighting control basics for a theater feel without a “cave” vibe,
- and simple audio planning that prevents rework when walls go up.
The Fortress Builders is a Utah design–build company built on “strength through structure.” That means theaters aren’t just built—they’re planned: room layout, soffits, electrical, low-voltage wiring, sound control, and lighting are coordinated early so the finished theater feels comfortable, clean, and built to last.
Helpful internal pages while you plan:
A theater fails when comfort is an afterthought
Most home theaters don’t fail because the picture isn’t sharp enough. They fail because people don’t want to sit there for two hours. The screen is too high. The front row is too close. The back row can’t see over heads. Or the aisle space is so tight that everyone has to stand up when someone needs to walk through.
That’s why the fundamentals matter: if you get screen wall placement, seating distance, and sightlines right, the rest of the theater decisions become easier—and the room actually gets used.
Homeowner takeaway: The best theater is the one you can watch comfortably from every seat—without thinking about the room.
Step 1: Choose the screen type first (because it determines the wall)
Your “screen wall” is not just where you mount a TV. It’s the focal wall that determines seating orientation, speaker placement, wiring routes, lighting control, and often the entire room layout.
Common home theater screen options
- Large TV: simple, bright, and easy for mixed-use basements. Great when the room also serves as a lounge.
- Projector + fixed screen: classic theater feel, larger image potential, requires more planning for light control and projector location.
- Projector + retractable screen: flexible for multi-use spaces, but still needs thoughtful wiring and screen housing placement.
- Ultra short-throw (UST) projector: sits near the screen wall, reducing long ceiling runs. Requires careful screen pairing and furniture planning.
Quick decision prompt:
- Is this a dedicated theater or a multi-use lounge?
- Will you watch mostly at night, or also during the day?
- Is light control realistic (blackout, shades, limited ambient light)?
- Do you want the “theater” feel of a projection screen, or the brightness simplicity of a TV?
Step 2: Screen wall placement (what to prioritize)
Good screen wall placement is about more than finding a blank wall. The goal is to create a screen wall that is centered, visually calm, and easy to support with audio and lighting—without awkward soffits or doorways interrupting the experience.
What makes a great screen wall?
- Clear width: enough wall width for screen size, speakers, and trim details without feeling cramped.
- Minimal interruptions: avoid doors, closets, or utility panels on the screen wall if possible.
- Controlled light: limit windows or direct glare hitting the screen wall.
- Wiring-friendly: routes for power, low-voltage, and speaker wiring that don’t force surface-mounted solutions later.
Screen height: the most common comfort mistake
Homeowners often mount screens too high because they’re copying living-room TV habits (or working around furniture). In a theater, the goal is comfort over time. A screen that’s too high forces neck tilt and makes the front row miserable.
A practical rule: plan the screen so seated viewing feels natural—especially for your “primary row,” the row you expect to use most often.
Best practice: Design the screen wall around seated eye level—not standing eye level.
Step 3: Seating distance home theater (comfort beats “biggest possible”)
People love the idea of a massive screen. But the right screen size is the one that matches your room’s seating distance and viewing angles.
When seats are too close, the image feels overwhelming, and viewers fatigue faster. When seats are too far, the screen feels underwhelming and the theater loses impact.
Use viewing angles as your “comfort guardrails”
One homeowner-friendly way to think about viewing comfort is by angle: how much of your field of view the screen fills. The exact best angle varies by personal preference, screen size, and content type. The key is to avoid extremes.
Practical planning method:
- Choose your likely screen size range (TV or screen diagonal).
- Map your main seating row distance.
- Confirm that front and back seats still feel comfortable—not just “possible.”
Don’t ignore the “second row reality”
Many basements are designed with a front row and a back row. That can work beautifully—but only if the room length supports it. If the room is short, the back row gets pushed against the back wall, which can compromise acoustics, comfort, and walkway space.
Step 4: Home theater sightlines (so every seat works)
Home theater sightlines are the invisible geometry that determines whether a two-row theater is enjoyable or frustrating. Sightlines answer one question: can each seat see the entire screen comfortably without heads blocking the view?
What blocks sightlines most often?
- Front row heads: the back row can’t see the lower part of the screen.
- Screen mounted too low: paradoxically, can create head blockage in two-row rooms.
- Insufficient row spacing: rows are too close, so viewing angles are awkward.
- Riser height guessed instead of planned: back row is raised too little (or too much).
Homeowner takeaway: If you want two rows, plan sightlines before you frame walls or finalize screen height. “We’ll figure it out later” usually becomes expensive later.
Step 5: Seating layout + aisles (the comfort that sells the room)
Seating comfort isn’t only about the chairs. It’s about space around them. A theater that forces people to climb over each other is the theater everyone avoids.
Plan aisles like a real room, not a tight closet
- Entry path: can someone enter and reach a seat without blocking the screen or stepping over legs?
- Side aisles: do you have at least one clear path that doesn’t interrupt viewing?
- Row spacing: can front-row occupants recline without blocking the walkway?
Exact clearances depend on your seating type (fixed, recliners, sectional), room size, and code considerations. Confirm practical dimensions with your designer and builder before committing.
Step 6: Riser considerations (when it makes sense, and what to plan)
A riser can solve sightline problems and create a true theater feel. But risers are structural features—you want to design them intentionally and coordinate them with flooring, headroom, and HVAC.
When a riser is worth it
- You want two rows and the room length supports comfortable row spacing.
- Sightlines require back row elevation for a full-screen view.
- You want the “stadium seating” feel (and the ceiling height can support it).
What to check before building a riser
- Ceiling height: ensure the back row still feels comfortable (especially for taller people).
- Step safety: risers need safe edges and lighting cues.
- HVAC supply/return: risers shouldn’t block airflow paths.
- Flooring transitions: coordinate with carpet, LVP, or other finishes.
Planning tip: A riser should be designed as part of the room plan (seats + screen + ceiling height), not added after the fact when you realize the back row can’t see.
Step 7: Lighting control basics (movie-ready without harsh glare)
Lighting is one of the biggest differences between “TV room” and “home theater.” You want enough light to enter, snack, and clean—without glare washing out the image.
Three lighting layers that work well in theaters
- Ambient (dimmable): enough base light for entry and general use.
- Accent lighting: wall sconces, step lights, or indirect light for atmosphere.
- Task lighting: minimal and targeted (for bar/snack areas if connected).
For low-ceiling basements, lighting design matters even more. See Basement Lighting for Low Ceilings for glare control and zone lighting ideas.
Controls that make theaters easy to use
- Separate switches: don’t put everything on one circuit.
- Dimmers: essential for theater mood and glare control.
- Scene options (optional): “Enter,” “Movie,” “Intermission,” “Clean.”
Electrical requirements and device compatibility vary. Confirm with qualified professionals and local authorities, especially when adding circuits or specialty controls.
Step 8: Basic audio planning (enough to avoid rework)
You don’t need to be an audio engineer to plan a theater well. But you do want a basic strategy before walls are closed, because wiring routes and speaker locations can become difficult to change later.
Start with the listening area (not the speakers)
Audio planning should revolve around the main seating position. Decide where your primary row sits, then plan speaker locations and wiring routes accordingly.
What to plan early
- Speaker locations: front stage, surrounds, and any ceiling/height speakers if used.
- Subwoofer strategy: placement impacts sound; plan power and cable paths.
- Equipment location: where will the receiver/amp live, and how will it be ventilated?
- Conduit or cable paths: plan for future upgrades, especially if equipment may change.
If sound control is a priority (especially in basements under bedrooms or near living areas), explore Comfort and Sound for Basements and Basement Soundproofing Strategies.
Step 9: Basement theater layout tips (so it fits the whole basement plan)
A theater doesn’t live in isolation. It shares space with hallways, storage, bathrooms, bars, and the main basement circulation. A great theater plan protects both viewing comfort and basement flow.
Layout principles that keep it livable
- Don’t route main basement traffic through the theater. Crossing in front of the screen gets old fast.
- Keep noisy zones separated. If there’s a game room or bar, buffer the theater if possible.
- Plan storage for remotes, blankets, and games. Clutter kills the “theater feel.”
If you’re still zoning the basement, start with Space Planning for Basement Finishing and Basement Layout Planning.
Permits, inspections, and wiring considerations
Depending on scope, basement theater builds can involve electrical permits and inspections—especially when adding circuits, running new wiring, installing recessed lighting, or modifying HVAC routes. Requirements vary by jurisdiction. Confirm with qualified professionals and local authorities.
Related: Permits and Inspections for Basement Finishing.
Theater planning checklist (use this before framing and wiring)
Bring this checklist to your design consult or planning meeting:
- Screen type chosen: TV, projector + fixed screen, retractable, or UST.
- Screen wall identified: clear width, minimal interruptions, good light control.
- Seating plan drafted: 1 row or 2 rows, with aisle strategy.
- Viewing comfort checked: seating distance and angles feel good for your main row.
- Sightlines validated: back row can see full screen (riser planned if needed).
- Lighting strategy: dimmable ambient + accent + safe entry lighting.
- Audio plan basics: speaker locations, equipment location, wire paths or conduit.
- Sound strategy: if needed, identify where sound control matters most.
- Basement flow protected: no main traffic path through viewing zone.
Conclusion: plan the room before you build the theater
Home theaters are one of the highest-enjoyment basement upgrades—when they’re planned for comfort. Start with the fundamentals: screen wall placement, seating distance home theater, and home theater sightlines. Then layer in lighting control and basic audio planning so wiring and framing support the final experience.
The smartest move is to design the room first—before framing closes options and before wiring becomes hard to reroute.
Want a basement theater your family will actually use?
If you’re building a home theater in Davis or Weber County, The Fortress Builders can help you plan screen wall placement, seating, sightlines, wiring, lighting, and sound control as one coordinated system—so the finished room feels effortless and built to last.
Request a Design Consult Explore Home Theater Design Explore Basement Finishing
Bring your room dimensions and your “must-have” seating goal (one row or two). We’ll help you map sightlines and wiring before construction begins.