
Heated Bathroom Floors: Electric vs. Hydronic and What to Expect
Heated bathroom floors are one of those “quiet luxury” upgrades that you don’t fully appreciate until you live with them. No more tiptoeing across cold tile on winter mornings. No more socks soaked from a damp bath mat. Just steady, comfortable warmth right where you stand.
But radiant heat is also one of those upgrades that works best when it’s planned early—before tile prep, before electrical and plumbing rough-ins are finalized, and before floor heights are locked in.
This comparison guide covers:
- How electric vs. hydronic radiant heat works (in plain English)
- Which system fits different bathroom remodel scenarios
- Electrical/plumbing planning and what to expect during installation
- Floor build-up, transitions, and how to plan radiant heat with tile
- Radiant floor thermostat placement and control tips that matter day-to-day
The Fortress Builders is a Utah design–build company built on one principle: strength through structure. That means we plan the systems behind the finishes—waterproofing, ventilation, and comfort upgrades like radiant heat—so your bathroom performs as well as it looks.
Related internal resources:
- Bathroom Remodeling in Utah: Built to Last
- Radiant Heated Bathroom Floors for Everyday Comfort
- Tile & Waterproofing Systems Built for Longevity
- Bathroom Vent Fan Sizing: How to Control Humidity and Odors
- Request a Design Consult
Important note: Electrical and plumbing requirements, permits, and inspection rules can vary. Always confirm details with qualified professionals and local authorities, and follow manufacturer instructions for your specific radiant heating system.
Warm floors make mornings better—if planned correctly
Radiant heat sounds simple: warm the floor, enjoy the comfort. In practice, the best outcomes come from treating radiant heat as a small “system” that interacts with:
- your tile assembly (subfloor, underlayment, thinset, grout),
- your bathroom waterproofing strategy (especially in wet zones),
- your electrical or plumbing rough-ins,
- and your daily routines (schedules, timers, how long showers run, etc.).
Big idea: Choose your floor-warming system before tile prep begins. It’s much easier (and cleaner) to coordinate radiant heat when the floor assembly is still flexible.
Floor warming vs. whole-room heating (set expectations early)
Heated bathroom floors are often installed as a floor warming system—meaning the goal is comfort underfoot, not necessarily heating the entire room as the primary heat source. Some bathrooms can be designed so radiant floors contribute significantly to room heating, but that depends on:
- bathroom size and insulation,
- how much of the floor can be heated (more on that soon),
- heat loss from exterior walls/windows,
- and the capacity of the radiant system you choose.
For most remodels, the most homeowner-friendly approach is: design for reliable comfort (warm tile where you stand) and keep your main heating system doing the heavy lifting in the rest of the room.
How radiant heated bathroom floors work
Radiant floor heat warms the floor surface. That heat then warms the room primarily through gentle radiation and natural convection (warm air rises). Unlike a vent blowing warm air, it’s a steadier, more even type of comfort.
In bathrooms, radiant heat is most commonly installed under tile because:
- tile and stone conduct heat well,
- they handle temperature changes reliably when installed correctly,
- and bathrooms already require careful floor prep, so the timing often aligns.
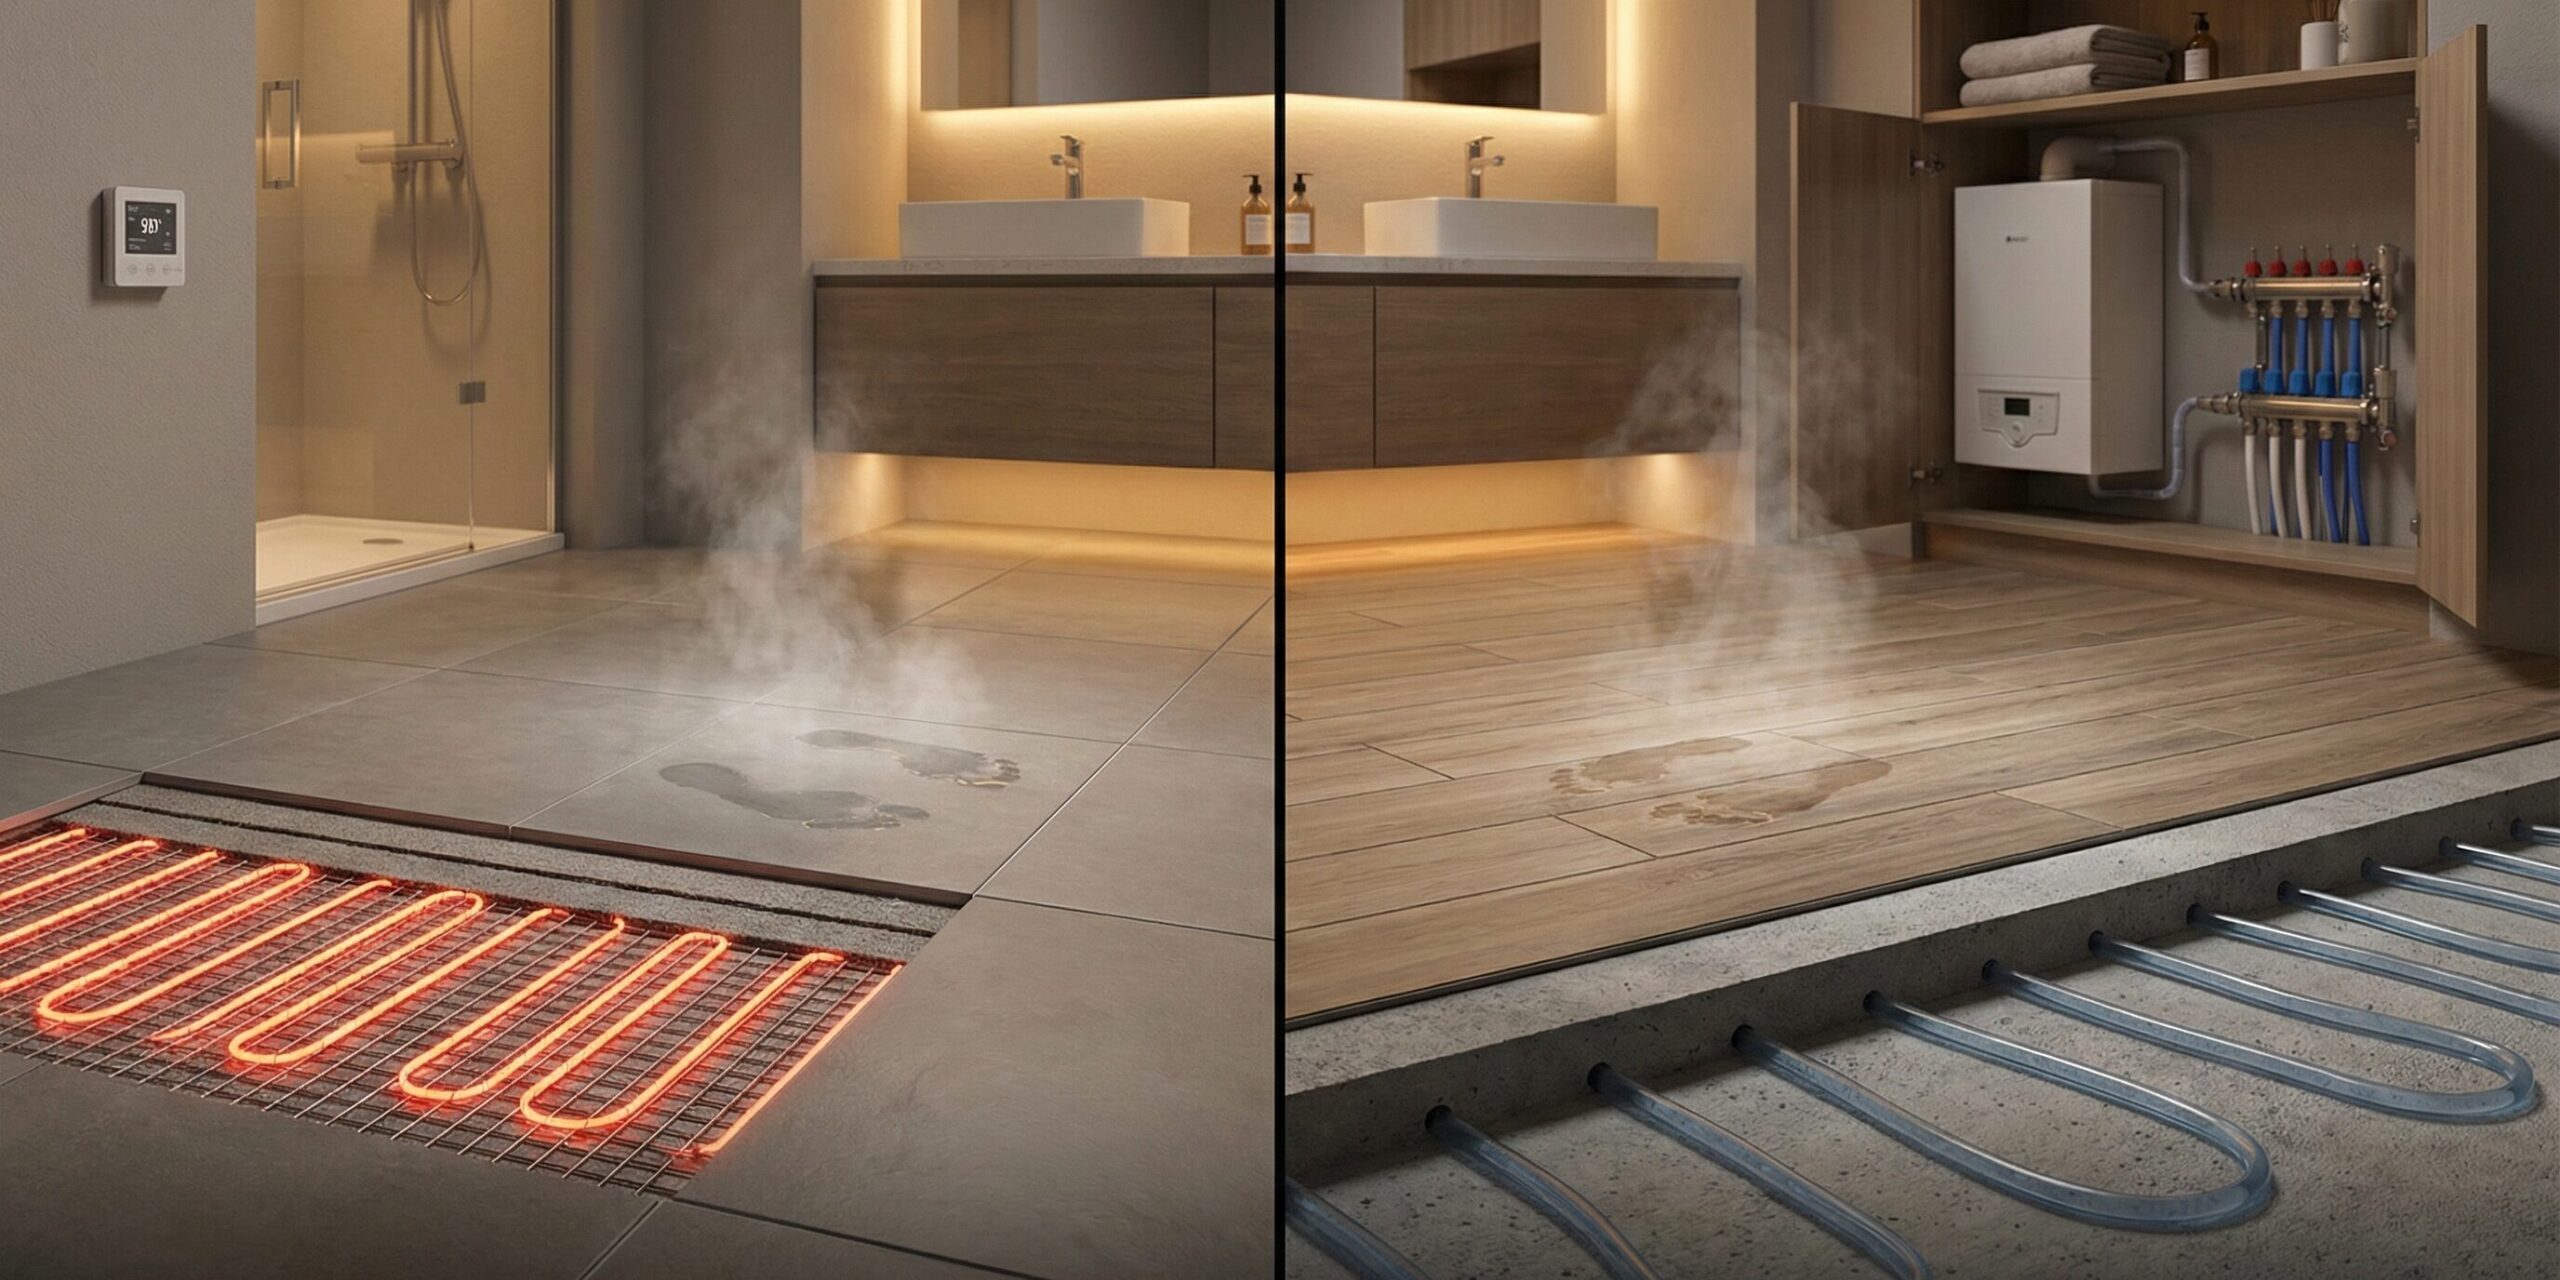
The two main options: electric vs. hydronic
Most heated bathroom floors fall into one of two categories:
- Electric radiant heat (heating cables or mats powered by electricity)
- Hydronic radiant heat (warm water circulating through tubing under the floor)
Let’s break them down without turning this into an engineering class.
Electric radiant heat: the go-to for most bathroom remodels
Electric heated bathroom floors use resistance heating—similar to how a toaster or electric blanket generates heat, but designed and rated for floor installations. The system typically includes:
- Heating element: either loose cable (woven in a pattern) or a pre-spaced mat
- Thermostat control: wall thermostat with floor-sensing capability
- Floor sensor: a temperature probe installed in the floor assembly
- Electrical connection: usually a dedicated circuit, typically with required GFCI protection (confirm with local code and manufacturer requirements)
Why electric is popular in bathrooms
In many remodels, electric radiant heat is chosen because it’s:
- Well-suited to small areas (like a primary bath or hall bath)
- Simpler to install than running hydronic tubing and tying into a boiler system
- Easy to zone (each bathroom can have its own thermostat)
- Responsive compared to higher-mass hydronic assemblies (depending on how the floor is built)
What electric radiant heat doesn’t do well
Electric radiant heat can be fantastic, but it has real constraints:
- Operating cost depends on your electricity rates and how you use it (schedules matter a lot).
- It’s usually not the best choice for heating large portions of a whole house.
- It requires proper electrical planning—this is not a “last-minute add-on” if the panel capacity or circuit routing is tight.
Hydronic radiant heat: powerful, flexible, and usually a “bigger plan”
Hydronic heated floors circulate warm water through tubing under the floor. That warm water typically comes from a heat source such as a boiler or other hot-water system (the exact design varies by home and equipment).
A hydronic system commonly includes:
- PEX or similar tubing laid under the floor
- Manifold that distributes water to different zones
- Pumps/controls to move and regulate flow
- Heat source (often a boiler, and sometimes other approved systems depending on design)
- Mixing/temperature control to keep floor water temps appropriate
Why hydronic is appealing (when it fits)
Hydronic radiant heat tends to shine when:
- you’re heating larger areas or multiple rooms,
- you’re doing a new build or major whole-home remodel,
- your home already has a hydronic heating infrastructure,
- or you want a system that can be integrated into a broader mechanical plan.
Why hydronic is less common as a “single bathroom upgrade”
Hydronic can be overkill for one small bathroom—mostly because:
- installation is more complex (plumbing + mechanical + controls),
- it typically requires more coordination with the home’s heating system,
- and it can require more floor assembly planning to accommodate tubing and heat transfer layers.
Rule of thumb: Electric systems are often the simplest path for a single-bathroom floor-warming upgrade. Hydronic systems often make more sense when radiant heat is part of a bigger home comfort strategy.
Electric vs. hydronic: a practical comparison for homeowners
If you’re deciding between systems, it helps to compare them across the factors that actually affect your remodel: project size, complexity, floor height, controls, and long-term maintenance.
| Decision Factor | Electric Radiant Heat | Hydronic Radiant Heat |
|---|---|---|
| Best for | Small areas like bathrooms; comfort floor warming | Larger areas; multiple rooms; whole-home strategies |
| Install complexity | Typically simpler (electric + floor assembly coordination) | More complex (plumbing/mechanical + controls + floor assembly) |
| Upfront scope | Often easier to add during a bathroom remodel | Usually best planned as part of broader mechanical planning |
| Operating cost | Depends on electricity rates and usage schedules | Depends on heat source efficiency and system design |
| Floor build-up risk | Often minimal, depending on product and install method | Can be more significant depending on tubing method and assembly |
| Controls | Simple zoning per room via thermostat and floor sensor | Zoning via manifolds, controls, thermostats, mixing strategies |
| Maintenance | Low routine maintenance; mostly thermostat/sensor health | More components (pumps, valves, heat source) to maintain |
Best-fit scenarios: which system should you choose?
Electric radiant floors are usually best if…
- You want heated bathroom floors as a comfort upgrade in one bathroom.
- Your remodel is mostly “contained” (not a whole-home mechanical redesign).
- You want straightforward controls with a dedicated thermostat.
- You’re installing tile (or another approved surface) and can plan the floor assembly properly.
- You want a solution that’s relatively easy to schedule into a normal bathroom remodel timeline.
Hydronic radiant floors are usually best if…
- You’re building new or doing a significant remodel where mechanical systems are already being redesigned.
- You want radiant heating in multiple rooms or larger areas.
- Your home already has (or will have) an appropriate hydronic heat source and distribution strategy.
- You’re comfortable with a more involved install and long-term mechanical maintenance planning.
If you’re on the fence, ask this one question
Are you heating a bathroom floor… or building a whole-house comfort strategy?
- If it’s mainly a bathroom comfort upgrade: electric is often the cleanest path.
- If it’s part of a bigger plan: hydronic might be worth exploring early.
If your bathroom remodel is part of a larger project, this resource can help you think through sequencing and coordination: Whole-Home Remodel Sequencing: The Order That Saves Time and Rework.
Plan radiant heat with tile: what changes in the floor assembly
Radiant heat sits “inside” your floor system—so you’re not just choosing a heater; you’re choosing a floor build. This is where many problems happen when radiant heat is added late.
Floor build-up: why it matters
Radiant systems (electric or hydronic) often add layers: mats/cables, embedding mortar, underlayment, decoupling membranes, or additional subfloor prep. The result can be extra floor height—and that affects:
- transitions to adjacent rooms,
- door clearance and swing,
- toilet flange height and fit,
- curb/threshold details at showers,
- and sometimes baseboards and cabinetry toe-kicks.
In a well-managed remodel, these are planned in advance—not discovered after tile arrives.
Subfloor prep is not optional
Tile and radiant heat both demand a stable, properly prepared base. Two fundamentals matter:
- Stiffness/deflection: the floor structure needs to meet tile requirements (your contractor can confirm based on framing and spans).
- Flatness: tile and heating elements install best on flat surfaces—especially large-format tile, which is less forgiving.
Related internal resource: Tile & Waterproofing Systems Built for Longevity.
Waterproofing and radiant heat can coexist—when detailed correctly
Radiant floor heat and waterproofing are different systems, but they have to work together in bathrooms. The exact approach depends on your shower design and the waterproofing method used.
Key homeowner concept: Tile isn’t waterproof. Waterproofing is the system behind tile—especially in wet zones. If you’re remodeling a shower, this guide explains what matters: Bathroom Waterproofing 101: What’s Behind Great Tile Work.
Note: Waterproofing methods, membrane compatibility, and installation sequences vary by system. Always follow manufacturer requirements and confirm details with qualified professionals.
Where you can (and can’t) heat the floor
Most bathroom floor warming systems are installed in the “open walking zones”—not under everything. Common best practices include avoiding:
- Under vanities (especially if fully enclosed) unless specifically designed for it
- Under toilets (usually avoided for layout and service reasons)
- Under tubs (often wasted heat unless the tub is elevated and the area is open)
- Under permanent built-ins where heat can’t dissipate as intended
This is why layout matters: the more open floor area you have, the more effective and noticeable radiant warmth can be.
Electrical and plumbing needs: what to expect tells you when to decide
Electric radiant heat: what your remodel needs to plan for
Electric floor warming systems aren’t complicated, but they do require real electrical planning. Typical considerations include:
- Dedicated circuit capacity (depends on system size and electrical load calculations)
- GFCI protection and appropriate bathroom electrical safety requirements
- Thermostat location (typically outside wet zones, often near the bathroom entry)
- Inspection timing (some jurisdictions require inspection before covering heating elements)
Important: Electrical codes and inspection requirements vary by location. Confirm your plan with a qualified electrician and local authorities.
Hydronic radiant heat: what your remodel needs to plan for
Hydronic systems involve more moving parts and design coordination. Planning often includes:
- Heat source coordination (boiler or other approved system capacity and controls)
- Manifold and zoning strategy (how multiple areas will be controlled)
- Plumbing rough-in and routing for supply/return lines
- Mixing/temperature control (floors typically need controlled water temps)
- Service access (components should be accessible for maintenance)
Important: Hydronic design and safety requirements vary widely. Work with qualified professionals and confirm permitting/inspection requirements with local authorities.
Radiant floor thermostat placement: small detail, big day-to-day impact
Homeowners typically think about the floor heating element, but the thermostat placement and sensor planning often determine whether the system feels “effortless” or annoying.
Where the thermostat usually works best
Most bathroom radiant thermostats are placed:
- near the bathroom entry (easy access),
- at a standard switch height,
- outside direct splash zones,
- and away from drafts or direct heat sources that can skew readings.
If you’re pairing radiant heat with other bathroom upgrades (lighting, outlets, fans), it’s smart to plan all wall controls as a group. Related: Bathroom Fixtures & Lighting That Elevate Daily Routines.
Floor sensor placement: what “good planning” looks like
Most electric systems use a floor temperature sensor embedded in the floor assembly. Best-practice principles (always follow the specific manufacturer instructions) often include:
- placing the sensor between heating runs (not touching a cable),
- positioning it in a representative “walking zone,”
- running the sensor wire in a way that can be serviced if needed (some systems allow conduit use for easier replacement),
- and documenting placement with photos before tile goes in.
Homeowner tip: Ask your installer to take a few photos of the heating layout and sensor location before the floor is covered. If you ever need service later, those photos are gold.
Controls and schedules: how to get comfort without wasting energy
Radiant heat feels best when it’s predictable. The goal isn’t to run the floor constantly; it’s to match heat to your routines.
Most homeowners prefer one of these approaches
- Morning warm-up: scheduled heat before the household wakes up
- Evening comfort: warm floor during bath time or nighttime routines
- “Always slightly warm”: a modest baseline temperature with bumps during peak use (depends on system and preference)
Set a realistic comfort goal
Heated floors are a comfort upgrade—not a contest to make tile “hot.” Overheating can be uncomfortable, and some flooring assemblies have temperature limits. Most systems allow you to choose a comfortable floor temperature range and/or set a floor temperature cap. Follow manufacturer guidance.
Pairing radiant heat with moisture control
Warm floors can help a bathroom feel drier, but they are not a substitute for ventilation. If your bathroom struggles with foggy mirrors or lingering humidity, start with ventilation design:
- Bathroom Vent Fan Sizing: How to Control Humidity and Odors
- Bathroom Ventilation & Moisture Control Done Right
- Mold Prevention in a Bathroom Remodel: Design + Ventilation Basics
What to expect during installation (and how it fits the remodel timeline)
Radiant heat doesn’t have to complicate your remodel—when it’s scheduled correctly. Here’s a typical high-level sequence for a bathroom floor warming system (details vary by product and project):
1) Design and layout decisions (before demolition is “done”)
- Confirm your heated area (walking zones).
- Confirm floor height impacts (transitions, door clearance, toilet flange).
- Plan thermostat placement and sensor routing.
- Coordinate with tile selection and floor assembly strategy.
2) Rough-ins and prep
- Electrical planning for electric systems (circuit, thermostat box, routing).
- Mechanical/plumbing planning for hydronic systems (tubing routes, manifolds, controls).
- Subfloor prep for tile (stiffness/flatness corrections).
3) Heating system installation and testing
Most reputable installers test systems before covering them. Electric systems are often tested for continuity/resistance and insulation integrity per manufacturer requirements. Hydronic systems are typically pressure-tested to confirm no leaks. Exact testing procedures vary by system.
4) Embedding and tile installation
The heating element/tubing is installed as part of the floor assembly and then covered/embedded per system instructions. Tile is installed over the appropriate layers, with proper mortars and cure times.
5) Cure time and commissioning
Many tile mortars and radiant systems require a waiting period before turning heat on, to allow materials to cure properly and avoid cracking or bond issues. Follow manufacturer and tile-setting material instructions—this is a common “do not rush” step.
Remodel timeline tip: If you’re coordinating multiple upgrades (tile + waterproofing + heated floors + ventilation), it helps to follow a clear sequence. This resource is useful for homeowners: Timeline and What to Expect.
Common mistakes to avoid (and how to spot them early)
Most “heated floor regrets” come from planning mistakes, not the concept itself.
Adding radiant heat too late
If the tile has already been planned and the floor heights are locked in, radiant heat can trigger compromises. Decide early so the floor system can be built correctly.
Not planning the thermostat and sensor
Thermostat placement and sensor routing should be decided before tile. A poorly placed thermostat or sensor can make the system behave inconsistently.
Forgetting about transitions and door clearance
Even small build-up can affect doors and thresholds. Good planning makes transitions look intentional—not like an afterthought strip.
Heating the wrong areas
Heating under large enclosed vanities or under fixtures often doesn’t improve comfort much. It can also create unnecessary complexity. Focus heat where people stand.
Turning the system on too soon
This is a big one. Tile assemblies and setting materials often need cure time. Turning on radiant heat early can stress the system before it’s ready.
Maintenance and longevity: what homeowners should know
Electric radiant floors (typical homeowner experience)
Electric systems generally require minimal ongoing maintenance. Practical homeowner tips include:
- Keep thermostat settings reasonable and use schedules.
- Test GFCI functionality as recommended (if applicable to your setup).
- If there’s ever a problem, avoid guesswork—have a qualified professional diagnose.
- Save documentation (system model, wiring notes, photos of layout).
Hydronic radiant floors (typical homeowner experience)
Hydronic systems can be extremely comfortable, but they’re part of a larger mechanical system. Maintenance typically involves:
- routine service for the heat source (boiler or other system),
- checking for proper operation of pumps/controls,
- and addressing any performance changes (air in lines, balancing issues, etc.) with professionals.
Bottom line: Hydronic systems often have more components to maintain—but they can also support larger comfort goals when designed correctly.
Decision checklist: is radiant heat right for your bathroom?
Quick “yes/no” checklist:
- Yes if you hate cold tile and want daily comfort.
- Yes if you’re already replacing the flooring (best time to add it).
- Yes if you’re installing tile or stone (excellent heat transfer).
- Maybe if your bathroom has limited open floor area (small footprint, large vanity, built-ins).
- Maybe if electrical panel capacity is tight (still possible, but needs planning).
- Plan carefully if you’re also doing curbless/complex shower waterproofing and floor transitions.
Questions to ask your remodeler before you commit
- “Which heated floor system fits our bathroom layout and why?”
- “How much open floor area will actually be heated?”
- “How will you manage floor height changes and transitions?”
- “Where will the thermostat go, and how will the floor sensor be placed?”
- “What’s the sequence with tile prep and cure time before turning heat on?”
- “Do permits or inspections apply for electrical/plumbing changes?”
FAQ: quick answers homeowners search for
Are heated bathroom floors worth it?
For many homeowners, yes—because it’s a daily comfort upgrade that changes how the bathroom feels. The key is matching the system to your remodel scope (electric for many single-bath upgrades, hydronic for broader strategies) and planning it early so it’s installed correctly.
Do heated floors work well under tile?
Yes. Tile is one of the most common and effective surfaces for radiant heat because it transfers warmth well. The floor assembly must be built correctly (subfloor prep, appropriate mortars/underlayments, and proper curing).
How long does it take for a heated bathroom floor to warm up?
It depends on the system type and the floor assembly. In general, higher-mass assemblies take longer to warm and cool, while lower-mass assemblies can respond faster. Using schedules is the best way to ensure the floor is warm when you need it.
Where should a radiant floor thermostat be placed?
Most thermostats are placed near the bathroom entry, outside direct splash zones, and in a convenient location for daily use. Floor sensor placement is equally important—follow system instructions and plan it before tile goes in.
Can radiant heat replace my bathroom’s main heat?
Sometimes—but not always. Many bathroom radiant installs are designed for floor warming comfort. Whether it can serve as primary heat depends on heat loss, bathroom size, how much floor area can be heated, and system capacity.
How Fortress Builders helps homeowners plan radiant heat the right way
Radiant heat is a perfect example of “strength through structure.” The finished tile looks great either way—but planning the layers underneath is what determines whether the system feels seamless and reliable for years.
If you’re considering heated bathroom floors in Davis or Weber County, Fortress Builders can help you:
- choose a system that fits your scope and comfort goals,
- coordinate radiant heat with tile, waterproofing, and transitions,
- plan thermostat placement and control strategy,
- and manage the remodel with a clear design–build process from concept to completion.
Explore:
- Radiant Heated Bathroom Floors for Everyday Comfort
- Bathroom Remodel Portfolio — Utah Homes
- Your Guide to a Seamless Remodel
Thinking about heated floors in your bathroom remodel?
Let’s plan it before tile prep begins—so your floor warming system, waterproofing, and finishes all work together cleanly.
Request a Design Consult Explore Bathroom Remodeling Radiant Heated Floors