
Bathroom Vent Fan Sizing: How to Control Humidity and Odors
A bathroom vent fan isn’t glamorous, but it’s one of the most important “protect the investment” choices in a remodel. When ventilation is sized and installed correctly, it helps:
- clear steam quickly so moisture doesn’t linger,
- reduce odors and keep the room feeling fresh,
- protect paint, drywall, trim, cabinetry, and grout,
- and support long-term mold prevention by keeping humidity under control.
In this homeowner-friendly guide, you’ll learn:
- what “bathroom vent fan sizing” really means (in plain English),
- how to choose CFM based on bathroom size and fixtures,
- why bathroom exhaust fan ducting affects performance more than most people realize,
- where to place a fan for best results (including bathroom fan placement tips),
- how to choose a quiet bathroom fan you’ll actually use,
- and simple maintenance steps that keep airflow strong year after year.
The Fortress Builders is a Utah design–build company built on “strength through structure.” That means every remodel starts with a detailed plan (so layout, budget, and timeline align early), and continues with disciplined project management and craftsmanship that holds up—especially in moisture-heavy rooms like bathrooms.
Helpful internal pages while you plan:
Ventilation is the invisible upgrade that protects everything you just paid for
Bathrooms are “wet rooms,” even when everything looks dry. Hot showers and baths pump water vapor into the air. That vapor finds the coolest surfaces—mirrors, windows, painted drywall, the ceiling above the shower—and condenses into tiny droplets.
Over time, lingering humidity can contribute to common bathroom problems:
- peeling paint and bubbling drywall on ceilings and upper walls,
- musty odors that never fully go away,
- mildew spots on grout, caulk, and silicone corners,
- warped trim or swollen wood products,
- and “always damp” conditions that make cleaning harder.
That’s why moisture control bathroom ventilation isn’t an afterthought in a well-planned remodel—it’s part of the structure that keeps the space performing the way it should.
Simple truth: Tile and paint are finishes. Ventilation is part of the system that keeps those finishes looking good.
What a bathroom vent fan should do (and what it can’t)
A bathroom exhaust fan has two core jobs:
- Clear humidity: remove moist air fast enough that steam doesn’t hang around and settle into surfaces.
- Clear odors: vent out smells and stale air so the bathroom feels fresh sooner.
It also helps with comfort. A bathroom that dries quickly feels better to use, especially in colder months when a steamy bathroom can feel clammy.
What a fan can’t do by itself
Even the best fan won’t fix these issues on its own:
- Leaky plumbing or water getting behind tile (that’s a waterproofing and installation issue).
- Chronic condensation caused by an uninsulated exterior wall or window (insulation and air sealing matter too).
- Moisture trapped by poor ducting (the fan can’t move air if the duct run is restrictive).
If you’re remodeling a shower, it’s helpful to remember: tile isn’t waterproof. The waterproofing system is behind it. Related read: Bathroom Waterproofing 101: What’s Behind Great Tile Work.
Moisture sources in real bathrooms (it’s not just the shower)
Most homeowners think about moisture when the shower is running, but bathrooms can hold humidity for multiple reasons:
- Hot showers and baths: obvious, but also the biggest contributor.
- Multiple showers back-to-back: common in family homes; humidity builds faster than it can be removed.
- Warm water at the vanity: smaller contributor, but it adds moisture during morning routines.
- Wet towels and bath mats: if they don’t dry, they keep adding moisture to the room.
- Doors kept closed: moisture stays trapped longer (especially in tight bathrooms).
This is why the goal isn’t “a fan that technically exists.” The goal is a fan system that can clear humidity and odors quickly—with a duct route that actually lets the fan do its job.
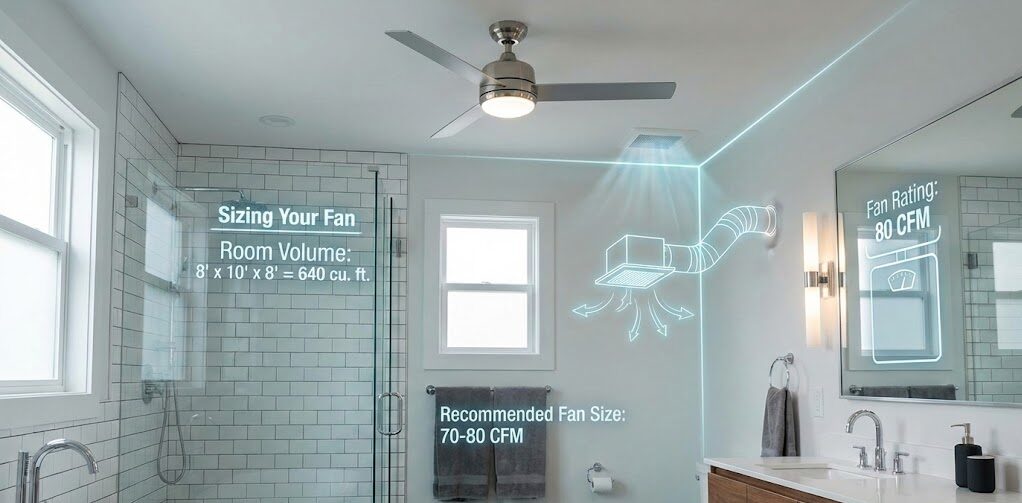
Bathroom vent fan sizing in plain English: what “CFM” really means
Bathroom vent fans are usually rated by CFM, which stands for cubic feet per minute. That’s the amount of air the fan can move in one minute (under standardized testing conditions).
Here’s the part homeowners miss: a fan’s CFM rating is only useful if the fan can actually move air through your duct route and out of the house. In other words:
Bathroom vent fan sizing = CFM + ducting + placement + controls.
A “100 CFM” fan connected to a long, crushed flex duct with multiple turns may behave more like a much smaller fan in real life.
When you hear someone say “just get a bigger fan,” they’re usually trying to solve a ducting or control problem with a CFM number. Sometimes that works. Often it doesn’t.
Three practical ways to size a bathroom exhaust fan
There are a few widely used methods for bathroom vent fan sizing. The right approach depends on the bathroom size, ceiling height, and fixture count. You’ll often see more than one method referenced—and that’s normal.
Method 1: The quick-sizing rule for bathrooms up to about 100 sq ft
A common guideline is:
For bathrooms up to about 100 sq ft: size around 1 CFM per square foot of floor area (often assumed with typical 8-foot ceilings).
Example: a 5′ x 10′ bathroom is 50 sq ft, so a fan around 50 CFM may meet the guideline.
Real-life note: Many homeowners choose a bit more capacity than the minimum guideline so the room clears faster—especially if the bathroom sees multiple showers per day or has limited natural airflow.
What about bathrooms with higher ceilings?
If your bathroom has a ceiling higher than 8 feet, it has more air volume. One homeowner-friendly way to think about that is to adjust the “1 CFM per sq ft” guideline upward proportionally.
Example: If you go from 8 feet to 9 feet, the room has about 12.5% more volume (9/8). A 80 CFM guideline becomes roughly 90 CFM if you scale it the same way. (This is a simplified approach; your remodeler or HVAC partner can calculate more precisely.)
Method 2: Fixture-based sizing for larger bathrooms
For bathrooms over about 100 sq ft, a common approach is to size based on the fixtures in the room. One widely referenced rule of thumb is:
- 50 CFM per standard tub
- 50 CFM per standard shower
- 50 CFM per toilet
- 100 CFM for a whirlpool/jetted/garden tub (because those spaces can release more moisture and often benefit from more ventilation)
This method recognizes that bigger bathrooms often have multiple moisture sources and longer air “paths” to clear.
Method 3: Volume-based sizing (air changes per hour)
If you want a more “math-based” approach, you can estimate a target number of air changes per hour (ACH) and calculate the CFM needed based on the bathroom volume.
A simplified formula looks like this:
CFM = (Bathroom volume in cubic feet × Target ACH) ÷ 60
Bathroom volume = length × width × ceiling height
Example: A bathroom that’s 10′ × 8′ with 9′ ceilings has a volume of 720 cubic feet. If you target 8 air changes per hour (a commonly referenced target for bathrooms), the math is:
- CFM = (720 × 8) ÷ 60 = 96 CFM
This method can be helpful for larger bathrooms or non-standard ceiling heights.
Homeowner takeaway: You don’t need to memorize the formulas. What you do want is a plan that accounts for your bathroom’s size, ceiling height, and real usage—and then confirms the ducting will support the performance you’re paying for.
Minimum requirements vs. “works well”: don’t confuse the two
Some building codes include minimum ventilation requirements for bathrooms (often expressed as intermittent or continuous airflow). Those minimums are a baseline—not a promise that your bathroom will feel dry quickly after a shower.
Important: Code requirements and enforcement vary by location and project scope. If your remodel includes electrical changes, duct routing, roof/wall penetrations, or structural work, confirm requirements with qualified professionals and the local building department.
Bathroom exhaust fan ducting: where good fans go to underperform
If you want a bathroom fan that actually clears humidity and odors fast, ducting matters as much as the fan itself. Think of it like a straw:
- A short, smooth straw lets you drink easily.
- A long, crushed straw with bends makes everything harder.
Bathroom exhaust fan ducting works the same way. The fan has to push air through the duct and out of the house. Every elbow, restriction, or sag adds resistance.
Best practices for bathroom exhaust fan ducting
These are widely accepted best practices in residential remodeling (always follow your fan manufacturer’s instructions and local code requirements):
- Vent to the exterior. Exhaust air should terminate outside (roof cap or wall cap), not into an attic, crawl space, or soffit cavity.
- Keep duct runs short and straight. Shorter runs and fewer turns reduce resistance and improve real airflow.
- Use the correct duct diameter. Don’t downsize the duct “to make it fit.” Follow the fan’s installation specs. Undersized ducts can reduce airflow and increase noise.
- Prefer smooth ducting where possible. Smooth, rigid duct tends to create less resistance than long runs of flexible duct.
- Insulate ducts in unconditioned spaces. In cold attics or exterior runs, insulating the duct helps reduce condensation inside the duct.
- Use a proper exterior termination. A wall/roof cap with a backdraft damper helps prevent cold air or pests from coming back in.
- Avoid dips and sags. Ducts should be supported so they don’t collect moisture in low spots.
Condensation in ducting: why Utah winters make this worth planning
In colder months, warm, moist bathroom air traveling through a cold attic duct can condense. That’s why good duct routing, insulation, and support matter. Many pros also aim for a duct run that encourages any condensation to move toward the exterior termination instead of pooling.
Details vary based on your home and duct route, so this is a great topic to review during planning—before drywall and finishes go in.
Red flag to avoid: “We’ll just run flex duct wherever it fits.”
A flexible duct can work in some situations, but long, sagging flex duct is one of the most common reasons bathroom fans feel weak and loud.
Bathroom fan placement tips: where the fan goes matters
Fan placement is often the difference between a bathroom that clears steam quickly and one that stays foggy long after the shower is off.
General placement goals
- Capture moisture at the source: place the fan near the shower/tub area where steam is generated.
- Avoid dead zones: the fan should be positioned so air actually flows from the door/room into the fan, rather than short-circuiting in one corner.
- Account for the layout: long bathrooms, separate toilet rooms, or large primary baths may need special planning.
Can a fan be installed in the shower?
Sometimes, yes—but it depends on the fan model, electrical requirements, and local code. If a fan is installed directly over a shower, it typically needs to be rated appropriately for wet/damp locations and installed according to manufacturer instructions. Electrical requirements (like GFCI protection) can also apply depending on the location and fixture ratings.
Because these requirements can vary, confirm placement and electrical details with qualified professionals and local authorities.
What about a separate toilet room?
In a primary suite with a separate water closet, you might consider a dedicated fan for that enclosed space—especially if odors linger or the room has limited airflow. Another approach is to use a fan that’s appropriately placed and controlled so it runs long enough to clear the entire bathroom zone.
Controls matter: the best fan is the one that runs long enough
Many bathroom fan complaints are really “control” problems. The fan might be fine—but it gets turned off too soon.
That’s why controls are a major part of moisture control bathroom ventilation.
Basic switch (works, but relies on memory)
A standard on/off switch works if everyone in the house is consistent about using it and leaving it on long enough after showers. In many real homes… that’s a big “if.”
Timer switch (one of the simplest upgrades that pays off)
A timer lets you set the fan to run for a defined period (like 10, 20, 30, or 60 minutes). Many homeowners find this is the easiest way to ensure the fan runs long enough after showers without having to remember to turn it off later.
Humidity-sensing controls (hands-off moisture protection)
A humidity-sensing fan or control can automatically turn on when humidity rises and turn off when it drops. This can be helpful for:
- kids’ bathrooms where the fan gets forgotten,
- bathrooms with frequent showers,
- and any space where you want a “set it and forget it” humidity response.
Humidity controls aren’t perfect in every situation (for example, they can be sensitive to seasonal humidity swings or placement). But for many homes, they’re a practical upgrade.
Related read: Humidity-Sensing Bathroom Fans: Worth It or Just a Gadget?
Quiet bathroom fan: what “sones” mean (and why quiet = more likely to be used)
Noise is a huge reason people avoid running their bathroom fan. If the fan sounds like a shop vac, it will “mysteriously” not get used.
Most fans list a sound rating in sones. Lower sones generally mean a quieter fan.
How to use sones when shopping
- Lower is quieter. Many homeowners aim for a low-sone fan in primary and guest bathrooms.
- Compare within similar CFM ranges. A higher-capacity fan can sometimes be quieter if it’s designed well or if it’s operating efficiently through proper ducting.
- Don’t ignore ducting. Poor ducting can increase noise and reduce airflow, even with a “quiet” fan.
Other ways to reduce fan noise
- Use the correct duct size (undersized ducting increases resistance and can make the fan work harder).
- Limit sharp turns in the duct route.
- Consider inline fans for certain layouts (an inline fan placed in an attic space can reduce noise in the bathroom itself, but installation details matter).
Homeowner takeaway: If you’re choosing between “quiet” and “powerful,” you often don’t have to. The real goal is a correctly sized fan with correct ducting—then choose a low-sone model so it actually gets used.
Vent fan ducting details that make (or break) real airflow
This section is intentionally practical. If your remodeler is planning ventilation, these are the details that separate “it passes” from “it performs.”
Rigid vs flexible duct
In general:
- Rigid smooth duct tends to provide better airflow over distance because it has less internal resistance.
- Flexible duct can work for short connections or tight spaces, but it must be stretched properly and supported to avoid sags.
Elbows and length
Every turn adds resistance. A fan that works great on paper can feel weak if the duct run includes multiple bends and long distances. This is why your team should plan ducting early—especially in remodels where routing options are limited.
Exterior termination location
Where the duct exits matters. A proper termination should:
- vent to the outside with a proper cap,
- include a damper to reduce backdraft,
- be placed so exhaust air isn’t pulled back into the house through nearby vents or soffit openings.
Backdraft dampers and cold drafts
Homeowners sometimes notice cold air sneaking in through bathroom fans in winter. A functioning damper can reduce this. If drafts are a problem, it’s worth asking your remodeler to confirm damper function and termination details.
Special situations: when a “normal” bathroom fan plan isn’t enough
Large primary bathrooms
Large primary baths often have:
- more volume (higher ceilings, larger footprint),
- multiple fixtures (shower + tub + toilet room),
- and more distance for air to travel.
In those cases, your plan might include a higher-capacity fan, better duct routing, or even multiple fans (for example, one near the shower zone and one near the toilet zone). What makes sense depends on layout and how the room is used.
Steam showers and high-moisture shower designs
Steam showers and high-output showers can generate a lot of humidity. Ventilation needs can be more demanding, and the surrounding bathroom may need a strategy that clears moisture reliably.
This is also where waterproofing and vapor management become even more important. If you’re planning a shower upgrade, see:
- Tile & Waterproofing Systems Built for Longevity
- Bathroom Waterproofing 101: What’s Behind Great Tile Work
Basement bathrooms
Basement bathrooms can be tricky because duct runs may be longer, and routing to an exterior wall or roof can require careful planning. Longer runs increase resistance, which can reduce effective airflow.
If you’re finishing a basement, it’s smart to plan ventilation early, especially when coordinating framing, soffits, and mechanical routes. Helpful resource: Basement Finishing in Utah: Space, Comfort & Value.
Windowed bathrooms
Opening a window helps, but it’s not a consistent plan—especially in winter or during storms. A vent fan provides predictable ventilation when you need it.
A homeowner-friendly vent fan selection checklist
Use this checklist when comparing fans or reviewing a remodel plan:
- Size: What CFM is recommended for the room size and ceiling height? If it’s a large bathroom, was fixture count considered?
- Ducting: What duct diameter will be used? How long is the run and how many elbows?
- Termination: Where does it vent outside (roof or wall), and does it include a damper?
- Noise: What is the sone rating? (Quiet bathrooms = more likely to run the fan.)
- Controls: Switch, timer, humidity sensor, or combination?
- Placement: Is the fan placed to capture steam effectively (near shower/tub zone)?
- Serviceability: Is the fan accessible for cleaning and future maintenance?
Maintenance checklist: keep airflow strong for the long run
Even a great fan can lose performance if it gets clogged with dust. A simple maintenance routine helps preserve airflow and reduce noise.
Bathroom vent fan maintenance (simple version)
- Monthly (or as needed): wipe dust from the grille if it’s visibly collecting.
- Every 6–12 months: remove the grille and clean it; vacuum dust from the fan housing if accessible (power off first).
- Seasonally: listen for new rattles or vibration and address early.
- After storms or roof work: if a fan suddenly feels weaker, confirm the exterior termination isn’t blocked.
If your bathroom struggles with persistent dampness or musty smells even with a running fan, that’s a signal to look at the whole system: fan size, duct resistance, damper function, and how long the fan actually runs after showers.
How ventilation fits into a full bathroom remodel plan
Ventilation is easiest to get right when it’s planned early—before tile, paint, and finishes go in. That’s one reason a design–build process matters: it helps coordinate “behind the walls” decisions alongside the visible selections.
When Fortress Builders plans a bathroom remodel, ventilation ties into:
- layout and fixture placement (fan location, toilet room separation, shower position),
- tile and waterproofing (keeping assemblies dry supports longevity),
- electrical planning (switch locations, timers, humidity controls),
- insulation and air sealing (reducing cold surface condensation),
- project sequencing (duct routes are much easier to build before finishes).
Explore related resources:
- Bathroom Ventilation & Moisture Control Done Right
- Mold Prevention in a Bathroom Remodel: Design + Ventilation Basics
- Bathroom Waterproofing 101
- Timeline and What to Expect
Want a bathroom that dries fast and stays fresh?
Whether you’re remodeling a hall bath or building a primary suite, getting ventilation right is one of the highest-ROI decisions you can make for comfort, durability, and long-term maintenance.
If you’re planning a remodel in Davis or Weber County, Fortress Builders can help you size the right fan, plan the duct route, and coordinate the details before finishes go in—so your bathroom performs like it looks.
Request a Design Consult Explore Bathroom Remodeling Ventilation & Moisture Control
Bring your bathroom dimensions (and any layout constraints) to a consult. We’ll help you plan a ventilation strategy that matches your home, your usage, and your finish selections.