
Basement Lighting for Low Ceilings: Bright, Comfortable, and Flexible
Basement Lighting for Low Ceilings: Bright, Comfortable, and Flexible
Basements don’t feel bigger because you added square footage. They feel bigger because they’re bright, balanced, and easy to use. And when you’re working with low ceilings, lighting does more than “help.” It becomes the design tool that lifts the entire space.
This guide focuses on basement lighting low ceilings—how to combine recessed lighting, wall lighting, and zone-based controls so the basement feels taller, warmer, and more inviting.
In this guide, you’ll learn:
- how to use lighting layers (ambient, task, accent) to make a low ceiling basement brighter,
- practical recessed lighting basement tips that reduce glare and avoid “spotlight ceilings,”
- how to design basement lighting zones so different activities can coexist,
- high-impact wall lighting basement ideas that visually “lift” the room,
- dimming and control strategies that make basements feel comfortable (not harsh),
- and how to work around soffits, ducts, and beams without sacrificing headroom.
The Fortress Builders is a Utah design–build company built on “strength through structure.” That means lighting is planned as part of the system: layout, soffits, HVAC routes, electrical rough-ins, and finish selections are coordinated early—so the basement performs like a main-floor space, not a dim afterthought.
Helpful internal pages while you plan:
Basement lighting low ceilings: bright, comfortable, and flexible
Low ceilings don’t have to feel low—if the lighting plan is intentional
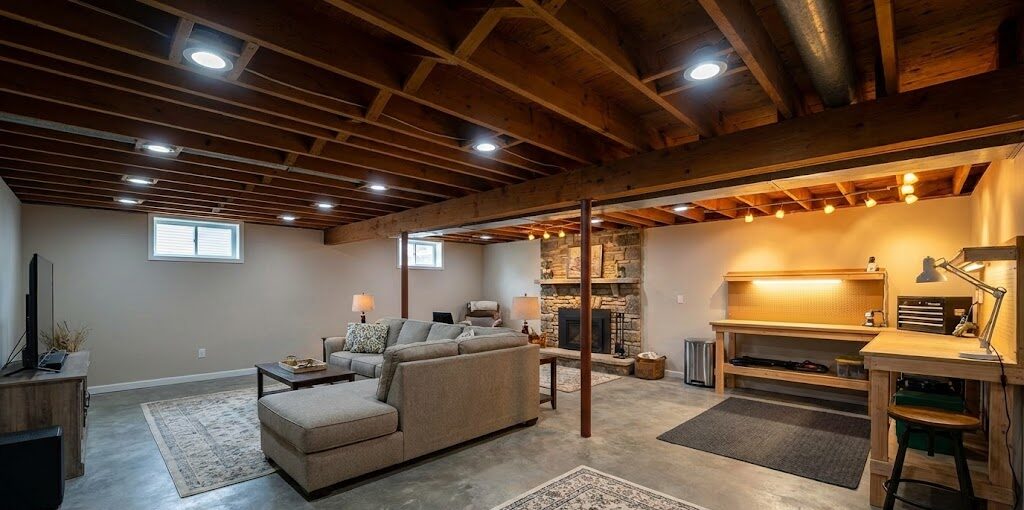
Most “dark basement” problems aren’t caused by paint color or furniture. They’re caused by lighting that’s either underpowered, poorly placed, too harsh, or all controlled by one switch. In a low-ceiling basement, those issues are amplified: glare is closer to your eyes, shadows feel heavier, and a few poorly placed cans can make the ceiling look like a dotted grid.
The solution isn’t “add more lights.” The solution is a layered, zone-based lighting plan that balances brightness, comfort, and flexibility—before electrical rough-in locks your options.
Simple truth: A basement feels taller when light is spread evenly, walls are softly illuminated, and glare is controlled.
Step 1: Understand the three lighting layers (and why basements need all of them)
Great basement lighting relies on three layers working together:
- Ambient lighting: the base layer that makes the room feel generally bright and safe.
- Task lighting: targeted light for reading, working, playing games, cooking, or doing hobbies.
- Accent lighting: the layer that creates depth, highlights features, and makes the space feel designed.
In basements, accent lighting is especially powerful because it can bounce light off walls and soffits—helping the ceiling feel less dominant.
Quick test: If your basement lighting plan is “recessed cans only,” you’re missing at least one layer. That’s usually why the space feels flat or harsh.
Step 2: Start with zones, not fixtures (basement lighting zones)
A finished basement usually serves multiple purposes: lounging, TV/movies, games, a home office, a gym, storage, and sometimes a bedroom or kitchenette. Each zone wants a different kind of light.
Common basement zones and what they need
- Lounge / TV zone: soft ambient + dimmable accent, minimal glare.
- Game / play zone: brighter, more even ambient light (less moody, more functional).
- Office / hobby zone: strong task lighting + controlled ambient, minimal shadows.
- Gym zone: bright, even light that doesn’t flicker or glare.
- Storage / utility: bright utility light (motion sensors often help).
- Wet bar / kitchenette: task lighting at counter + accent under-cabinet or shelf lighting.
Zone strategy ties directly into layout planning. If you’re still organizing the basement footprint, start with Basement Layout Planning: Zones That Make the Space Feel Bigger.
Homeowner takeaway: Zones should have independent controls. A basement that’s all on one switch rarely feels comfortable.
Step 3: Recessed lighting basement tips for low ceilings
Recessed lighting is popular in basements because it keeps the ceiling line clean and preserves headroom. But in low ceilings, recessed lights can also create glare and that “ceiling full of holes” look if spacing and beam spread aren’t planned well.
Use fewer recessed lights—then support them with other layers
A common mistake is over-lighting the ceiling with too many downlights to compensate for low brightness. Instead, use recessed lights as the ambient backbone, then add wall and accent lighting to create depth.
Placement: avoid spotlighting walls and faces
General best practice is to place downlights so they wash the space evenly without creating harsh pools. In low ceilings, the “pools” are more obvious, and fixtures can be visible in your peripheral vision. That’s why the next step—glare control—matters.
Glare control: choose trims and optics that feel comfortable
- Consider glare-reducing trims so the light source isn’t so visually sharp.
- Use dimming to soften the room at night.
- Avoid placing downlights directly over seating positions where people look up and see the light source.
Fixture selection and compatibility (especially with dimmers) should be confirmed with qualified professionals.
Step 4: Wall lighting basement ideas that make the ceiling feel higher
If your goal is to make a low ceiling basement brighter, wall lighting is one of the most effective tools. Why? Because lighting walls creates vertical brightness—your eyes read the space as taller and more open.
High-impact wall lighting types
- Sconces: can add warm, residential character; great in lounges, hallways, and offices.
- Wall wash lighting: highlights texture, art, or a feature wall and adds depth.
- Uplighting in soffits: bounces light upward, visually lifting the ceiling line.
- Backlit shelving or cabinetry: adds glow without ceiling clutter.
Design trick: If you light the walls well, you can use fewer ceiling fixtures—and the basement will still feel brighter.
Step 5: Working around soffits, ducts, and beams (without sacrificing headroom)
Soffits are common in basements because mechanical systems need routes. In a low-ceiling basement, soffits can feel intrusive—but they can also become an advantage if you use them to organize lighting.
Use soffits to define lighting zones
- Perimeter soffit lighting: run accent or indirect lighting along edges to “frame” the room.
- Transition lighting: use soffit lines to separate lounge vs. game zones without walls.
- Integrated downlights: place recessed fixtures within soffits where ceiling height is already lower—so the main ceiling remains visually clean.
Don’t hide everything if it makes the ceiling feel lower
Sometimes the best solution isn’t to box in every duct. A good design team will weigh headroom, visual calm, and cost—then choose a soffit strategy that feels intentional.
Step 6: Fixture selection for low ceilings (keep it slim, quiet, and consistent)
In low ceilings, fixture choice is about comfort and proportion. Bulky fixtures hang into sightlines and make the ceiling feel lower. Mismatched fixture temperatures or brightness levels make the space feel choppy.
Practical selection priorities
- Low-profile fixtures: keep ceiling planes clean.
- Consistent color temperature: so rooms don’t feel patchy (confirm specs before purchase).
- Good dimming performance: especially in lounge/theater areas.
- Flicker-free feel: particularly in work/gym zones (verify product quality and compatibility).
Step 7: Glare control (the difference between “bright” and “pleasant”)
Homeowners often say, “I want it brighter,” when what they really mean is, “I want it to feel better.” In basements with low ceilings, glare is one of the biggest reasons spaces feel uncomfortable.
Glare control strategies that work
- Use more indirect light: wall wash, uplight, under-shelf lighting.
- Dim in layers: instead of one bright ceiling system.
- Avoid placing downlights directly over seating: keep lights slightly forward of couches/chairs so the beam lands in the room, not in eyes.
- Use warmer lighting in relaxation zones: especially in evening spaces (confirm with your designer/electrician).
Rule of thumb: If you feel like you need to squint in your basement at night, you don’t need “more lumens.” You need better glare control and zones.
Step 8: Dimming and controls (how to make it flexible)
Basements work best when they adapt: bright for cleaning and projects, softer for movies and hosting, focused for office time. That only happens when lighting controls are planned intentionally.
Control strategies that homeowners actually use
- Separate zones on separate switches: lounge, game, bar, hall, storage.
- Dimmers where mood matters: lounge, theater, bar, guest areas.
- Motion sensors where convenience matters: storage rooms, utility areas, some hallways.
- Scene control (optional): “Movie,” “Entertain,” “Clean,” “Work” presets.
Electrical requirements and device compatibility vary. Confirm dimmer/fixture compatibility and code needs with qualified professionals and local authorities.
Step 9: Lighting plans for common basement spaces
Below are practical “recipes” you can use as starting points. Exact fixture counts and placement depend on your basement layout, ceiling height, and how zones connect.
1) Family lounge / TV zone
- Ambient: a modest grid of recessed lights (dimmable).
- Accent: wall sconces or wall wash, shelf lighting, or soffit uplight.
- Comfort: avoid direct downlights over seating.
2) Game / play zone
- Ambient: brighter, more even overhead lighting.
- Task: targeted light over game tables or activity zones.
- Controls: separate from lounge zone so the two can coexist.
3) Home office zone
- Ambient: even light that reduces eye strain.
- Task: desk lamp or directional task lighting.
- Glare control: avoid hot spots on monitor screens.
4) Wet bar / kitchenette zone
- Task: under-cabinet lighting for counters.
- Accent: shelf lighting for display and warmth.
- Ambient: a small, consistent overhead layer.
If you’re planning a basement kitchenette, see Basement Kitchenette Planning: Power, Plumbing, and Layout Tips.
Step 10: The lighting plan should happen before electrical rough-in
Once electrical rough-in is complete, changing lighting locations can become expensive—especially in finished basements where access is limited. That’s why lighting design should be coordinated with:
- basement layout and zoning,
- soffit and duct routing,
- TV locations, built-ins, and furniture plans,
- and future flexibility (office-to-guest-room changes, etc.).
Before rough-in, bring these to your planning meeting:
- a simple furniture plan (TV wall + seating),
- your zone list (lounge, play, office, gym, storage),
- any soffit constraints you already know about,
- and your “must-have” lighting features (dimming, accent, under-cabinet, etc.).
Permits, inspections, and electrical requirements
Electrical work often requires permits and inspections, depending on scope and jurisdiction. Requirements can vary, so confirm with qualified professionals and local authorities—especially when adding circuits, moving panels, running new wiring, or integrating specialty lighting controls.
Related: Permits and Inspections for Basement Finishing: What to Expect in Utah.
Lighting plan checklist (use this before you approve the electrical rough-in)
Quick checklist:
- Zones defined: lounge, play, office, gym, bar, storage, halls.
- Layers included: ambient + task + accent (not just recessed).
- Glare plan: downlights not placed directly over seating; trims/placement chosen for comfort.
- Wall light plan: at least one wall-based layer in main zones (sconces, wash, shelf lighting).
- Soffit strategy: soffits integrated into lighting plan (not random boxes).
- Control plan: separate switches + dimmers where needed; motion sensors where helpful.
- Future flexibility: spare capacity or adaptable zones if the basement use may change.
Conclusion: a low ceiling basement feels bigger when lighting is layered and zoned
Low ceilings don’t have to feel like a limitation. With a smart plan—recessed lighting where it helps, wall lighting where it lifts, and basement lighting zones that support real life—you can create a basement that feels bright, comfortable, and flexible.
The best time to make those decisions is before electrical rough-in, while you still have full freedom to place fixtures, build in accent lighting, and coordinate soffits with the design.
Want a basement lighting plan that feels like a main-floor space?
If you’re finishing a basement in Davis or Weber County, The Fortress Builders can help you design a lighting strategy that works with your ceiling height, soffits, and layout zones—so the finished space feels bigger, brighter, and built to last.
Request a Design Consult Basement Lighting & Electrical Explore Basement Finishing
Bring your basement dimensions and a rough zone plan. We’ll help you map lighting layers and controls before rough-in—so the build stays smooth.