
Basement Insulation Basics for Comfort and Sound Control
Insulation is comfort and durability, not just a checkbox. A basement can look beautifully finished on day one and still feel “off” day-to-day—cold floors, temperature swings, echo, and that slightly damp smell that makes you crack a window even in winter. Most of those problems trace back to one thing: the invisible layers behind the drywall (insulation, air sealing, moisture control, and sound strategy).
This guide breaks down basement insulation basics for homeowners planning to finish or remodel a basement in Utah (and beyond). We’ll focus on warmth, consistent temperatures, and better noise control—while avoiding the common mistakes that can lead to condensation and mold behind finished walls.
The Fortress Builders is a Utah design–build company built on one principle: strength through structure. Fortress starts with a detailed design blueprint that aligns your vision, budget, and timeline—then coordinates permitting, project management, and construction with transparent updates and disciplined craftsmanship. In basements, that matters because doing it “pretty” isn’t the same as doing it right.
- How basement insulation differs from above-grade walls (and why that matters)
- Basement finishing insulation strategies for walls, rim joists, and ceilings
- How to do sound control basement insulation without turning your basement into a recording studio
- How to avoid condensation basement walls with moisture-smart assemblies
- A homeowner-friendly checklist before framing and drywall
Helpful internal links while you plan:
- Basement Finishing in Utah: Space, Comfort & Value
- Comfort and Sound for Basements
- Basement Moisture Management & Protection Systems
- Basement Moisture Checklist: What to Fix Before You Finish the Space
- Basement HVAC & Ventilation Planning
- Radon and Basement Finishing: When to Test and How to Plan Mitigation
- Request a Design Consult
Important note: Insulation, vapor control, ventilation, electrical, and permit requirements vary by jurisdiction, home conditions, and climate. Use this article for planning and best-practice concepts, then confirm details with qualified professionals and local authorities.
Comfort you can feel, durability you don’t have to worry about
When homeowners say “we want to finish the basement,” what they often mean is:
- We want the basement to feel as comfortable as the main floor.
- We want it to stay comfortable year-round without constantly adjusting the thermostat.
- We want it to be quieter (or at least not amplify every footstep and TV sound).
- We don’t want to discover mold behind new drywall two years later.
That’s exactly where basement comfort insulation and smart sound design come in. The good news: you don’t need exotic materials or “perfect” upgrades. You need the right order of operations and the right assembly for your home.
Big idea: A basement is not just “a room below.” It’s a different building environment—more connected to soil moisture, colder surfaces (concrete), and often more air leakage at the rim joist. The best insulation plan is one that handles all three: water, air, and temperature—then adds sound control where it counts.
Why basement insulation is different from upstairs insulation
Upstairs, your exterior walls face outdoor air. In a basement, your “exterior walls” often face the ground. That changes the rules in three important ways:
1) Concrete is cold, and cold surfaces create condensation risk
Concrete and masonry can stay cool for long stretches of the year. If warm indoor air reaches a cold surface inside a wall assembly, moisture can condense—especially if the wall can’t dry. That’s why homeowners often hear warnings about “not putting fiberglass right against concrete.” The concern isn’t the fiberglass itself; it’s that the assembly can trap moisture and become a mold-friendly environment.
2) Basements have more moisture pathways
Even if you’ve never had water on the floor, basements can experience moisture through:
- bulk water (leaks, seepage, foundation cracks, window wells)
- capillary movement (moisture wicking through concrete)
- humidity (especially in summer or in homes with limited ventilation)
- air leakage (warm/moist air entering and contacting cold surfaces)
This is why basement finishing moisture issues and insulation decisions are tied together. If you don’t control moisture, you can’t “insulate your way out” of the problem.
3) The rim joist is a comfort and moisture hotspot
The rim joist area (the band of framing where the house sits on the foundation) is often leaky and under-insulated. It can create cold drafts, condensation, and even frost in winter in some homes. It’s also one of the highest-impact places to focus your insulation and air sealing efforts.
Step zero: fix bulk water and dampness before you insulate
This is the part homeowners sometimes skip because it feels unrelated to “finishing.” But finishing over moisture is one of the most expensive mistakes you can make in a basement remodel. If you haven’t already, start here:
Basement moisture pre-check (before insulation)
- Exterior drainage: gutters clean, downspouts routed away from the foundation, grading slopes away from the house
- Foundation: visible cracks, staining, or efflorescence (white mineral deposits) noted and evaluated
- Window wells: clear, draining, and not holding water
- Sump pit: functioning pump (if present), secure lid (if required), and clear discharge path
- Humidity: musty smells or consistently high humidity addressed (often with ventilation and/or dehumidification)
If you see standing water, active leaks, or recurring dampness, pause and investigate before insulating or framing. The right fix depends on the cause.
If you want a step-by-step homeowner guide, this Fortress resource is a great companion:
Basement insulation basics: the “four layers” that make a basement feel finished
When insulation goes wrong in basements, it’s often because one layer is missing—or done out of order. Here are the four layers that matter most in a basement finishing project:
1) Bulk water control (outside + foundation)
Drainage, grading, and foundation issues must be managed before you close up walls. Insulation is not a water management system.
2) Air sealing (the comfort multiplier)
Air leaks don’t just waste energy; they move moisture into assemblies and create cold drafts. Air sealing is often the highest “comfort per dollar” upgrade in basements.
3) Thermal control (insulation that keeps surfaces warm)
In basements, the goal isn’t only “more R-value.” It’s keeping key surfaces warm enough to reduce condensation risk and temperature swings.
4) Sound strategy (targeted, not everywhere)
Sound control works best when it’s intentional: isolate the theater area, quiet bedrooms, and reduce noise transfer between floors where it matters.
If you remember one thing: Basements fail when moisture + air movement meet cold surfaces. The most reliable basement finishing insulation strategies prioritize air sealing and a wall assembly that manages condensation risk—not just stuffing batts in a stud wall.
Air sealing: the most underrated “insulation” upgrade
Many homeowners think insulation equals batts in the wall. In reality, air sealing often does more for comfort—especially in basements—than adding more insulation without sealing.
Where basements commonly leak air
- Rim joist area: gaps at framing, sill plate, and penetrations
- Plumbing/electrical penetrations: around pipes and wires through the foundation or framing
- Mechanical chases: large open pathways for ducts, flues, or utility runs
- Old windows/doors: drafts around frames and sash
- Top of foundation walls: where framing meets concrete
Why air sealing helps you avoid condensation basement walls
Air carries moisture. When warm, moist air leaks into a wall cavity and meets a cool concrete surface, condensation can form. Tightening up the air leaks is one of the most direct ways to reduce that risk.
Note: “Sealed tight” doesn’t mean “no fresh air.” It means air moves where you control it (via ventilation) rather than through random gaps.
Basement wall assemblies: the homeowner-friendly options
This is usually the core question: How should we insulate basement walls? There isn’t one perfect answer for every home, but there are clear patterns that tend to perform better for comfort and condensation control.
Below are common approaches, what they’re good at, and what to watch out for.
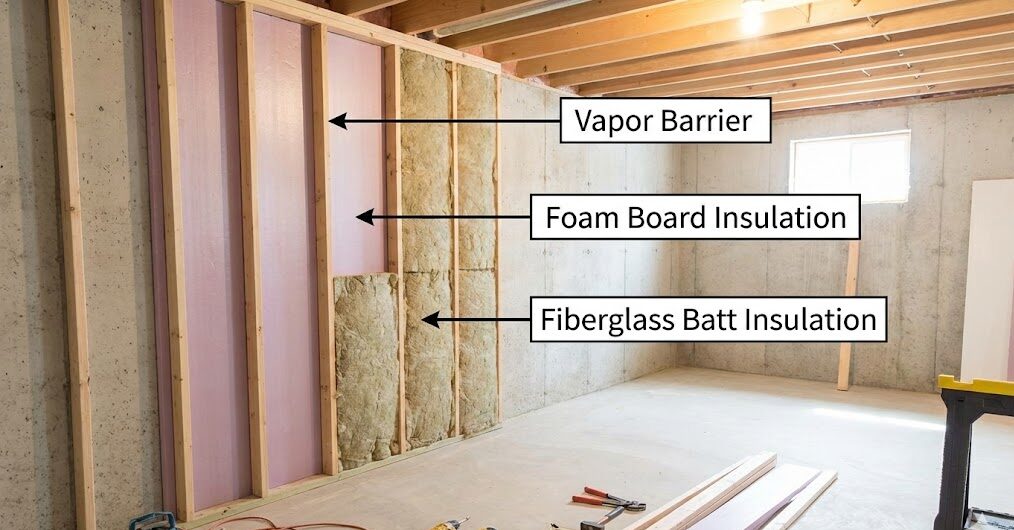
Option A: Continuous foam (or spray foam) against concrete + framed wall in front
This is a widely used approach in basement finishing because it helps keep the interior surface of the wall warmer. A warmer surface generally means less condensation risk.
Concept: create a “warm jacket” against the concrete, then build a framed wall for wiring, drywall, and finished surfaces.
Common variations:
- Rigid foam board attached to the concrete, seams sealed, then a stud wall built in front
- Closed-cell spray foam applied to the concrete, then a stud wall built in front
- Hybrid: foam against concrete + batt insulation in the stud cavities
Why homeowners like it:
- often improves comfort (warmer wall surface)
- can reduce condensation risk when detailed properly
- works well with finished basements (wiring, outlets, drywall)
Important details to confirm with your contractor:
- how seams and edges will be sealed (air leakage matters)
- how the assembly will meet local fire safety requirements (some foam products require a thermal barrier like drywall)
- how moisture will be managed at the bottom of the wall and at penetrations
- how the framing will be kept off the concrete where needed
Option B: Fiberglass or mineral wool batts in a stud wall (with no continuous insulation)
This is common in older basements and budget remodels, but it’s also where many basement finishing moisture issues show up if the assembly is not designed for the conditions.
Why it can be risky: Batts alone don’t stop air movement. If warm indoor air reaches cold concrete, condensation can occur—especially if the wall can’t dry properly. This is one reason you’ll hear the “don’t put fiberglass directly against concrete” warning.
When homeowners still see it used:
- when the basement has excellent exterior moisture control
- when the home’s layout and mechanical strategy manage humidity well
- when local code requirements drive a specific vapor retarder approach
Important note: Vapor control requirements depend on climate zone and local code. A qualified professional should design the correct assembly for your home and location.
Option C: Insulating from the exterior (best in new construction, harder in retrofits)
Exterior foundation insulation can be very effective because it keeps the foundation wall warmer and helps manage condensation risks—but it’s often impractical in a typical basement finishing project because it may require excavation and exterior work.
If you’re doing a larger whole-home project or major exterior work, your design-build team can evaluate whether this makes sense. For most basement finishes, interior strategies are more common.
How to choose: a simple decision guide for homeowners
| Your Basement Condition | What to Prioritize | Often a Better-Fit Strategy |
|---|---|---|
| Basement has a history of dampness or humidity | Moisture control + warm interior surfaces + air sealing | Continuous insulation against concrete (rigid foam or spray foam), plus careful air sealing |
| Basement is consistently dry with solid drainage | Comfort + efficient installation + code-aligned vapor strategy | Hybrid approach (continuous insulation + batts), or another assembly designed by your pro |
| You’re adding bedrooms / office and want quieter rooms | Sound control + comfort + HVAC planning | Wall assembly that manages condensation + targeted sound measures (especially in ceiling) |
| Low ceiling height is a concern | Preserve headroom and avoid bulky soffits | Plan routing early; choose wall thickness intentionally; coordinate sound strategies without dropping ceilings more than needed |
The rim joist: small area, huge comfort payoff
If you’re trying to make a basement feel “not like a basement,” the rim joist is often the unsung hero. It’s a common source of:
- cold drafts
- cold floors along exterior walls
- condensation on framing in winter
- pest entry points
Common rim joist insulation approaches
- Closed-cell spray foam: often effective because it insulates and air-seals in one step
- Rigid foam + sealed edges: foam cut to fit, edges sealed with compatible sealant/foam; performance depends heavily on detailing
- Hybrid detailing: used where access is tricky or where there are many penetrations
Note: The “best” approach depends on access, existing utilities, fire safety requirements, and your project scope. A good plan should also preserve access to important shutoffs and service points where needed.
Homeowner tip: Ask your contractor to show you the rim joist plan. If it’s not part of the conversation, you’re likely leaving comfort on the table—especially in winter.
Basement floors: do you need under-slab or subfloor insulation?
Basement floors are tricky because:
- the slab can be cool (especially in winter)
- moisture can migrate through concrete
- finished flooring materials have different tolerance for moisture
- adding subfloor layers affects ceiling height and stair transitions
What matters most for floor comfort
In many basements, homeowners feel the biggest comfort improvement when:
- the rim joist is sealed and insulated, and
- basement walls are insulated with a moisture-smart assembly, and
- HVAC/ventilation is balanced for consistent temperatures.
Floor insulation or insulated subfloor systems can be a great upgrade in some cases—especially if you’re creating a playroom, workout space, or bedrooms—but it should be evaluated alongside headroom, moisture risk, and your flooring choice.
If you’re unsure: your design-build team can help you weigh whether your budget is better spent on wall/rim upgrades first or on subfloor comfort upgrades.
Moisture note: Because slabs can transmit moisture, flooring and subfloor products should be selected and installed according to manufacturer instructions, and moisture conditions should be evaluated before install.
Sound control basement insulation: what works, what’s realistic, and where to focus
“Soundproofing” can mean a lot of things. For most homeowners, the goal isn’t total silence—it’s creating a basement that feels calm and private:
- TV or movie noise doesn’t travel to bedrooms upstairs
- Footsteps and kid chaos are less noticeable between floors
- Basement bedrooms feel quieter and more private
- Mechanical noise (furnace, plumbing) is less intrusive
To get there, it helps to understand two types of sound:
Airborne sound (voices, TV, music)
This travels through air and then vibrates the surfaces it hits. Strategies that help:
- adding insulation in ceiling cavities (often mineral wool or fiberglass)
- adding mass (extra drywall layers)
- sealing gaps (sound leaks through cracks)
Impact sound (footsteps, dropped items)
This transfers vibration through structure. Strategies that help:
- decoupling (isolation clips, resilient channel)
- floor treatments upstairs (rugs, padding) depending on your home
- careful detailing around ducts and framing connections
Want a deeper dive? Fortress has a dedicated breakdown here:
Ceiling sound strategy: the most common “high-impact” zone
If you do one sound-focused upgrade in a basement, it’s often the ceiling between floors—because that’s where family life collides (TV downstairs, bedtime upstairs).
Common options (in increasing intensity):
- Basic: insulation batts in the ceiling cavities + sealing gaps
- Better: add resilient channel or isolation clips to reduce vibration transfer
- Even better: add additional drywall layer(s) for mass, with proper sealing at edges
- Targeted upgrades: focus heavier sound measures above theaters, offices, or bedrooms
Planning note: Some sound assemblies affect ceiling height. In a basement, inches matter—so it’s important to plan this early, especially near soffits, ductwork, and lighting.
If your basement includes a theater or media zone, this page is a useful resource:
- Basement Home Theater Design & Build
- Home Theater Basics: Screen Wall, Seating Distance, and Sightlines
Walls and doors: don’t overlook the simple stuff
Sound doesn’t only travel through ceilings. Two practical upgrades that help with “real life” comfort:
- Door choice: a more solid door on bedrooms and mechanical rooms reduces sound transmission
- Sealing: sealing gaps around ducts, returns, and penetrations helps sound (and comfort) more than most people expect
Ventilation and humidity: insulation needs a moisture plan
Insulation improves comfort, but it doesn’t automatically solve basement humidity. In fact, when you finish a basement, you often change how it breathes:
- more drywall and finished surfaces
- more doors and enclosed rooms
- different airflow and temperature patterns
A smart basement plan includes a strategy for consistent temperature and humidity control. That can include:
- balanced HVAC supply/return planning
- ventilation solutions where needed
- dehumidification (especially in humid seasons or in moisture-prone basements)
Fortress’s homeowner-friendly guide is a great next step:
Comfort tip: Many basement “cold” complaints are actually airflow complaints. If the basement doesn’t get enough conditioned air—or doesn’t have a good return path—it will feel off even with decent insulation.
Vapor barriers and vapor control: what homeowners should know
Vapor control is one of the most confusing topics in basement finishing because:
- different climates need different strategies
- local building codes may require specific vapor retarder approaches
- materials behave differently (foam vs. batts vs. concrete)
- the right answer depends on the full assembly, not one product
Rather than giving you a one-size-fits-all instruction (which would be risky), here’s the homeowner-friendly way to think about it:
Vapor control in basements: the safe planning approach
- Ask your contractor what the wall assembly is designed to do: How does it manage moisture, and where can it dry?
- Ask how the assembly helps avoid condensation basement walls (surface temperature + air sealing + vapor control).
- Confirm the plan meets local code requirements for your jurisdiction and climate zone.
- Make sure the insulation strategy is compatible with your moisture conditions (and with any waterproofing/drainage plans).
Common basement insulation mistakes (and how to avoid them)
If you want to protect your investment, skim this list before your basement gets framed. These are patterns that repeatedly show up in basements that feel uncomfortable or develop moisture problems behind finishes.
Mistake 1: Finishing over moisture (or “we’ll deal with that later”)
If you have bulk water issues, high humidity, or foundation leaks, finishing first usually means paying twice. Start with the moisture plan.
Mistake 2: Treating fiberglass batts as an air barrier
Batts can help with thermal and sound performance, but they don’t stop airflow. If the assembly relies on batts alone without air sealing and a moisture-smart strategy, comfort and condensation risk can suffer.
Mistake 3: Ignoring the rim joist
The rim joist is a comfort multiplier. Skipping it can leave you with cold zones and drafts even if the walls are insulated.
Mistake 4: Using the same “upstairs wall” logic in a basement
Basements need assemblies that handle cold concrete surfaces. What works above-grade doesn’t always translate below-grade.
Mistake 5: Building sound control as an afterthought
Adding sound control after drywall is up is difficult and expensive. If you want a theater, office, or quiet bedrooms, plan the ceiling and door strategy early.
Mistake 6: Not coordinating insulation with HVAC and ventilation
Insulation helps, but airflow and humidity control often determine whether the basement feels comfortable year-round. Plan these systems together.
Basement finishing insulation strategies by use case
Not every basement needs the same level of insulation or sound control. A storage-heavy basement has different needs than an in-law suite or home theater. Here’s a practical way to align your insulation strategy with how you’ll actually use the space.
Family room + play space
- Comfort priority: consistent temperature and fewer drafts
- Sound priority: reduce TV noise traveling upstairs
- Common approach: moisture-smart wall assembly + rim joist sealing + ceiling insulation (and consider decoupling above the media zone)
Bedrooms (especially for guests or teens)
- Comfort priority: warmer walls and stable temps
- Sound priority: privacy (airborne sound)
- Plan early: egress requirements can affect layout and windows
Related planning resource:
Home office
- Comfort priority: stable temperature (no “cold desk corner”)
- Sound priority: reduce noise transfer both ways (calls, meetings)
- Targeted sound: ceiling sound measures above office + solid door + sealed gaps
Home theater or media room
- Comfort priority: controlled temperature (electronics and bodies generate heat)
- Sound priority: keep bass and movie audio from traveling
- Common approach: stronger ceiling isolation + wall/door strategy + HVAC plan for quiet airflow
Explore Fortress basement theater services and planning:
In-law suite / apartment-style space
- Comfort priority: “main-floor comfort” expectations (temperature stability, fewer drafts)
- Sound priority: privacy zones (bedroom, living space, laundry/mechanical separation)
- Systems priority: ventilation, humidity control, and layout planning matter a lot
Related planning resource:
Basement insulation planning checklist (before framing and drywall)
This is the “save it to your notes” section. If you do these items in order, you’ll dramatically reduce the chance of comfort or moisture regrets later.
Pre-Framing Basement Insulation Checklist
1) Moisture and air assessment
- Address bulk water issues (drainage, cracks, window wells, sump)
- Assess humidity patterns; plan ventilation/dehumidification if needed
- Identify obvious air leaks (rim joist, penetrations, mechanical chases)
2) Health and “hidden systems” planning
- If applicable, complete a radon test and plan mitigation early if needed: Radon and Basement Finishing
- Plan HVAC supply/return strategy for consistent comfort
3) Choose the wall assembly (not just the insulation type)
- Confirm how the wall assembly manages condensation risk
- Confirm air sealing details (seams, edges, penetrations)
- Confirm code-aligned vapor control approach (varies by location)
4) Don’t forget the rim joist
- Confirm insulation + air sealing plan for the rim joist
- Keep access to shutoffs and service points where needed
5) Plan sound control where it matters
- Decide where you need quieter rooms (bedrooms, theater, office)
- Choose ceiling strategy early (batts only vs. isolation clips/channel vs. added drywall mass)
- Plan door strategy (solid doors, sealing, mechanical room isolation)
6) Coordinate permits and inspections
- Confirm what permits/inspections apply in your area (details vary)
- Use this Fortress overview as a starting point: Permits and Inspections for Basement Finishing
When to bring in a pro (and what questions to ask)
Basement insulation is one of those topics where “a little knowledge” is helpful—but the final plan still benefits from experienced eyes. Consider professional guidance when:
- your basement has a history of dampness, musty odors, or previous leaks
- you’re planning bedrooms, an in-law suite, or a theater (higher comfort/sound expectations)
- you’re unsure about vapor control requirements or assembly design
- you’re changing HVAC, adding bathrooms, or doing significant air sealing
Questions homeowners can ask (without sounding like an expert)
- “What wall assembly are you recommending, and how does it manage condensation risk?”
- “Where are the air sealing steps—especially at the rim joist and penetrations?”
- “How will the basement be heated/cooled, and how will air return to the system?”
- “Which areas are you targeting for sound control, and what is the strategy?”
- “What permits/inspections apply here, and who handles them?”
How Fortress Builders approaches basement comfort and sound
Basement finishing is one of the best ways to add usable living space—if it’s planned as a complete system. Fortress Builders’ design–build process helps homeowners avoid the “finish first, fix later” trap by starting with a detailed blueprint, then coordinating the build with clear communication and disciplined execution.
That approach is especially valuable in basements, where the most important work is often the least visible:
- moisture management
- air sealing
- insulation assembly design
- sound strategy
- HVAC and ventilation planning
If you’re exploring a basement project, these pages can help you see the bigger picture:
- Basement Finishing in Utah: Space, Comfort & Value
- Comfort and Sound for Basements
- Basement Remodel Portfolio — Finished Spaces
- Your Guide to a Seamless Remodel
Build a basement that feels like the rest of your home
If you want a basement that’s warm, consistent, and quieter—without moisture surprises—your insulation plan deserves the same level of attention as your finishes. The best time to dial it in is before framing and drywall, when the right assembly choices are easiest to build and easiest to verify.
Request a Consultation Explore Basement Finishing Comfort & Sound Services