
Basement Bathroom Rough-In Guide: Plumbing, Venting, and Smart Placement
Basement Bathroom Rough-In Guide: Plumbing, Venting, and Smart Placement
A basement bathroom is one of the most valuable upgrades you can make when finishing lower-level space. It adds function, convenience, and long-term flexibility. But unlike a bedroom or lounge area, a bathroom is shaped by plumbing reality.
This basement bathroom rough-in guide walks you through what a “rough-in” actually means, how basement bathroom plumbing venting affects placement, and why basement drain location planning should happen before framing ever starts.
In this guide, you’ll learn:
- how to read and evaluate existing rough-ins,
- what limits (and expands) your placement options,
- how drainage slope and venting routes shape design,
- smart basement bathroom placement tips that avoid costly rework,
- fixture layout considerations before concrete is cut,
- and a coordination checklist to confirm feasibility before final design.
The Fortress Builders is a Utah-based design–build company built on one principle: strength through structure. That means plumbing layout, framing, waterproofing, and finish design are coordinated from the beginning—so your basement bathroom isn’t just attractive, but technically sound and built to last.
Helpful pages while you plan:
Basement bathroom rough-in guide: plumbing, venting, and smart placement
The easiest basement bathrooms are the ones planned around plumbing reality
When homeowners imagine a basement bathroom, they often start with finishes: tile, vanities, walk-in showers. But the real foundation of a basement bath is hidden below the slab and inside the framing—drain lines, vent stacks, slopes, and tie-ins to the main sewer line.
If you plan around those realities early, your basement bathroom design planning feels smooth. If you ignore them, you may face expensive slab cutting, awkward layouts, or mechanical work that compromises ceiling height.
Core principle: Let the plumbing lead the layout—then refine the design. Not the other way around.
What is a basement bathroom rough-in?
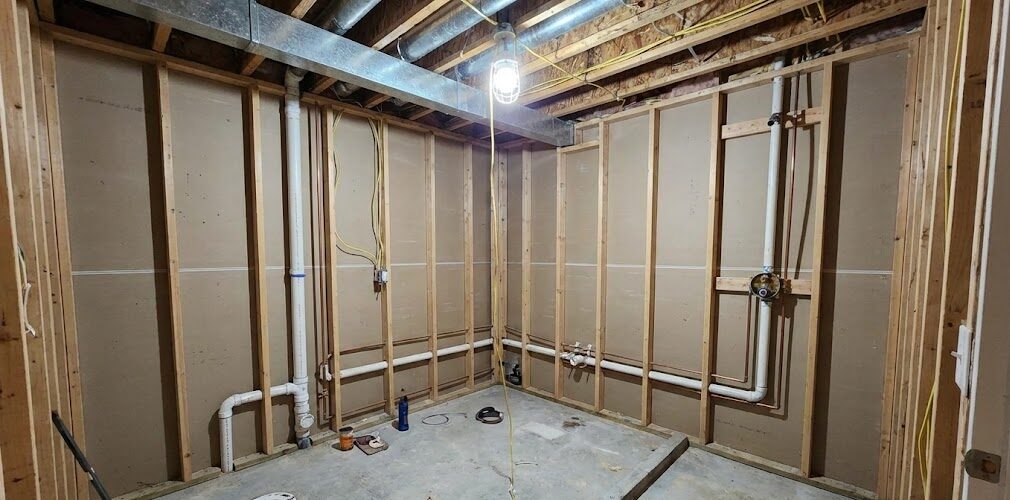
A “rough-in” refers to the plumbing installed before fixtures and finishes are added. In a basement, this typically means:
- a toilet drain stub-out (often capped and visible in the slab),
- a sink drain location,
- a shower or tub drain location,
- vent piping provisions (sometimes already tied into the main vent stack),
- and water supply lines nearby or roughed into framing.
Some new homes include a pre-plumbed basement bath rough-in. Others do not. Even if a rough-in exists, it doesn’t automatically guarantee the layout you want.
Step 1: Reading existing rough-ins
If your basement has plumbing stub-outs in the slab, start by identifying each one correctly. Misidentifying drain lines can lead to costly errors.
Typical drain sizes (general guidance)
- Toilet drain: usually 3″ or 4″ pipe.
- Shower/tub drain: often 2″ pipe.
- Sink drain: typically 1.5″–2″ pipe.
Actual sizes and configurations vary. Always verify with a licensed plumbing professional before assuming function.
Questions to ask about existing rough-ins
- Does the drain tie directly into the main sewer line?
- Is there adequate slope from fixture to main line?
- Where does the vent connection occur?
- Are clean-outs accessible?
- Will the layout meet local plumbing code?
Local plumbing codes and inspection requirements vary by jurisdiction. Always confirm details with qualified professionals and local authorities.
Step 2: Basement drain location planning
If you do not have an existing rough-in—or if it’s poorly positioned—you’ll need to plan drain placement carefully. Drain lines rely on gravity. That means slope matters.
Why slope determines everything
Drain lines require consistent downward slope toward the main sewer line. If the main line is higher than your proposed fixture location, special solutions may be required (such as sewage ejector systems).
Because slab cutting and re-routing can significantly impact cost and timeline, this step should happen before framing or finish planning begins.
Common placement realities
- Bathrooms placed directly below existing upstairs baths are often easier to tie into plumbing stacks.
- Bathrooms located far from the main sewer exit point may require longer drain runs.
- Low sewer exits may require lift systems.
Smart placement tip: When possible, align basement bathrooms vertically with existing plumbing stacks. It reduces complexity and risk.
Step 3: Basement bathroom plumbing venting explained
Drain lines remove waste. Vent lines protect the drainage system by allowing air into the pipes so water flows smoothly and traps don’t siphon dry.
Without proper venting, toilets can gurgle, sinks can drain slowly, and sewer gases may enter the room.
Venting options in basements
- Tying into an existing vertical vent stack.
- Running a new vent through framing to connect above.
- Using approved air admittance valves (where permitted).
Venting rules are highly code-specific. Always confirm approved methods locally before proceeding.
Step 4: Smart fixture placement before framing
Once drain and vent feasibility is confirmed, refine your fixture layout.
Toilet placement
- Allow proper clearance on each side.
- Confirm distance from finished wall to flange center.
- Plan wall framing depth accordingly.
Shower or tub placement
- Coordinate drain location with shower pan dimensions.
- Plan for waterproofing and proper slope.
- Confirm head height in areas affected by soffits.
Vanity and sink placement
- Check supply line accessibility.
- Plan for electrical outlets and lighting early.
For shower waterproofing guidance, see Bathroom Waterproofing 101.
Step 5: Waterproofing and moisture management
Basements require special attention to moisture control. A basement bathroom combines plumbing, humidity, and below-grade conditions—so waterproofing must be intentional.
- Use approved waterproofing systems behind tile.
- Ensure proper shower pan slope toward drain.
- Seal penetrations carefully.
- Coordinate ventilation planning early.
Explore Basement Moisture Management & Protection Systems.
Step 6: Coordination checklist before final design
- Confirm drain slope feasibility.
- Confirm vent route and compliance.
- Verify fixture clearances meet code.
- Plan electrical rough-in locations.
- Confirm ceiling height compliance.
- Review moisture control details.
- Verify permit requirements.
Permits and inspections
Basement bathroom installations typically require permits and inspections, especially when altering plumbing or structural elements. Requirements vary by location. Confirm with local building departments and qualified professionals.
See: Permits and Inspections for Basement Finishing.
Conclusion: verify feasibility before final design
A beautiful basement bathroom starts below the surface. When drain locations, venting routes, and slope requirements are evaluated early, the rest of the design process becomes smoother and more predictable.
Before committing to layout or finishes, confirm plumbing feasibility. That single step protects your budget, timeline, and peace of mind.
Planning a basement bathroom in Davis or Weber County?
The Fortress Builders coordinates layout, plumbing feasibility, waterproofing, and finish design into one clear plan—so your basement bathroom is built right from the start.
Request a Design Consult Explore Basement Bathrooms
Bring your measurements and any existing rough-in information. We’ll help you verify what’s possible before walls go up.