
Radon and Basement Finishing: When to Test and How to Plan Mitigation
Radon Test Before Basement Finishing: When to Test and How to Plan Mitigation
Radon is easiest to address before walls go up. If you’re planning to finish your basement—adding a family room, bedrooms, a home office, a guest suite, or a theater—radon deserves a spot on your “do this early” list. Not because it’s complicated for homeowners to understand, but because the timing matters. Testing and radon mitigation planning are typically much simpler (and less disruptive) when the space is still open—before framing, drywall, and finished ceilings make access harder.
This guide is written for homeowners who want clarity—not scare tactics. You’ll learn:
- What radon is and why it’s relevant to basement finishing radon decisions
- When and how to do a radon test before basement finishing
- How mitigation is typically planned and what “system coordination” really means
- How a radon system can be integrated with insulation, HVAC, and layout—without creating ugly chases or future maintenance headaches
- A practical checklist you can use during planning and before rough-in
The Fortress Builders is a Utah design–build company built on one principle: strength through structure. Every project starts with a detailed blueprint that aligns your vision, budget, and timeline—then Fortress coordinates permitting, project management, and construction with disciplined craftsmanship and clear communication. In basements, that process matters because “invisible systems” (air movement, moisture management, radon, ventilation, electrical) can make or break long-term comfort.
Helpful internal links while you plan:
- Basement Finishing in Utah: Space, Comfort & Value
- Basement Moisture Management & Protection Systems
- Basement Moisture Checklist: What to Fix Before You Finish the Space
- Basement HVAC & Ventilation Planning
- Permits and Inspections for Basement Finishing: What to Expect in Utah
- Request a Design Consult
Important note: Radon testing guidance, mitigation methods, electrical requirements, and permitting/inspection rules can vary by location and by home. Use this article to plan smart questions and timing, then confirm details with qualified professionals and local authorities.
Finish the basement, not the risk: test early and plan mitigation while access is easy
Basement finishing is a big upgrade—one that often increases how much time your household spends on the lowest level of the home. That’s exactly why Utah radon basement test planning (or radon testing anywhere you live) belongs in the early stage of a basement project.
When a basement is unfinished, it’s usually easier to:
- Run mitigation piping in clean, direct routes
- Choose fan placement that minimizes noise and maximizes serviceability
- Coordinate electrical and any needed permits without rework
- Seal sump lids or slab penetrations properly (if applicable)
- Keep the finished design looking intentional—no surprise soffits or boxed-in chases
Homeowner reality check: Radon is invisible and odorless. You can’t “sense” it by walking into your basement. Testing is the only reliable way to know what you’re dealing with—and finishing can change airflow patterns enough that “I tested once years ago” may not be the confidence you want before investing in drywall and flooring.
What is radon (and why basements are part of the conversation)?
Radon is a naturally occurring radioactive gas that can enter homes from the ground. It’s produced by the natural breakdown of uranium in soil and rock. Radon can seep into homes through openings such as cracks in slabs, gaps around pipes, sump pits, and other foundation penetrations.
Because basements are in direct contact with the ground and are often the lowest level of a home, they’re commonly the place where radon levels are highest. That doesn’t mean every basement has a radon problem—but it does mean the basement is typically where testing matters most, especially before you turn it into living space.
Why homeowners should care (without panic)
Radon is a health concern because long-term exposure to elevated levels increases lung cancer risk. The risk is especially higher for smokers (radon and smoking together are a serious combination). The good news is that radon is measurable, and if levels are elevated, mitigation systems are a widely used, established approach to reduce radon levels in homes.
“But my basement feels dry and clean…”
Totally fair—and also not a reliable indicator. Radon isn’t tied to “musty basements.” Some homes with beautiful, dry basements test high; some damp basements test low. Radon is a separate issue from moisture (though both often show up in basement planning).
If you’re also working through moisture questions before finishing, this companion resource is worth reading:
When to test: the smartest timing for a radon test before basement finishing
The theme of this article is timing. Here’s the homeowner-friendly version:
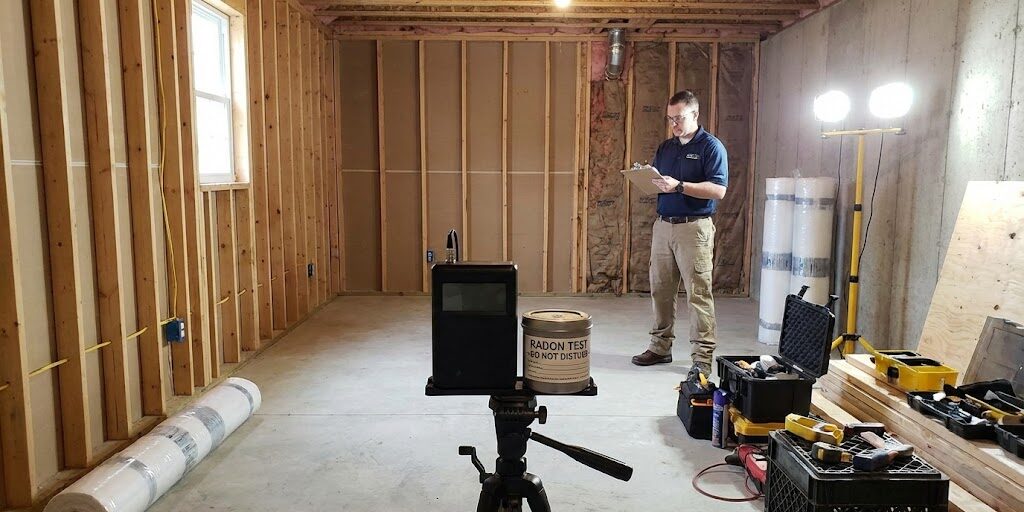
Best time to test (most practical for a remodel): Test before you finalize the basement finishing plan—ideally before framing and electrical rough-in.
That way, if mitigation is needed, radon system coordination can be built into the plan instead of forced into the finished space.
Testing moments that typically make sense
- Before finishing starts: This is the big one—test early so results can shape the plan.
- After major foundation work or drainage changes: Changes can alter air movement and soil gas entry pathways.
- After HVAC or ventilation changes: Mechanical changes can affect pressure relationships in the home.
- When converting a basement into bedrooms or long-stay living space: Because time spent in the space increases.
- Periodic re-testing: Many homeowners test again periodically or after big home changes, since conditions can shift over time.
Important: Follow the instructions that come with the radon test kit you use, and consider professional guidance for test placement and interpreting results—especially if you’re making a major remodeling investment.
Short-term vs. long-term tests: what homeowners should know
Radon tests generally fall into two categories:
- Short-term tests (often a few days) are commonly used for initial screening and quick decision-making.
- Long-term tests (often weeks to months) can provide a better picture of average radon levels across changing weather and living conditions.
If you’re in the planning phase for a basement remodel, many homeowners start with a short-term test because it fits the project timeline. If results are borderline or you want a stronger “average” picture, a long-term test may be recommended by your testing instructions or a radon professional.
Where to place the test (the practical rule)
Radon test placement depends on the kit instructions, but the general concept is simple: test in the lowest level of the home that you use—or plan to use—regularly. If you’re about to finish the basement, that usually means testing in the basement.
Typical placement best practices include:
- Place the device in a frequently used area (or where you plan future living space).
- Keep it away from drafts, exterior doors/windows, and direct airflow from vents.
- Avoid kitchens, bathrooms, or laundry rooms unless instructions say otherwise (humidity and ventilation can skew some tests).
- Follow the kit’s guidance for height and distance from walls.
Basement finishing tip: If you already know where the future living areas will be (bedrooms, family room, office), place the test where you expect people to spend the most time—unless your test kit instructions specify differently.
Understanding results: “What number is too high?” and what to do next
Radon is measured as a concentration in the air. In the U.S., a commonly referenced guideline is the EPA action level of 4 pCi/L (picocuries per liter), which is widely used as the threshold for recommending mitigation. Some guidance also encourages considering mitigation at lower levels (for example, between 2 and 4 pCi/L), especially if the space will be occupied frequently.
Important: There’s no way to predict radon risk by looking at a home, and radon levels can vary over time. Follow guidance from your test kit and consult qualified professionals if you’re unsure what your results mean for your home and your remodel plans.
A homeowner-friendly decision ladder
| Test Result Pattern | What It Suggests | Practical Next Step |
|---|---|---|
| Low result (within your kit’s “acceptable” range) | Radon may not be a major driver right now | Document results, proceed with finishing plan, consider periodic retesting or after major changes |
| Borderline / uncertain (varies by kit guidance) | Radon may fluctuate; short test may not represent long-term average | Consider a follow-up test (often long-term) or consult a radon professional before you close walls |
| Elevated (at/above common action guidance) | Mitigation is likely recommended | Plan mitigation before finishing; coordinate vent routes, electrical, and access with your remodel |
Why timing matters: If mitigation is needed, you can integrate it cleanly during basement finishing—hiding piping in walls or mechanical areas, planning electrical runs, and keeping future access simple. Waiting until the basement is finished can mean opening ceilings, building soffits, or cutting through finished spaces.
What radon mitigation typically looks like (in plain language)
Radon mitigation systems come in different forms depending on the home, but one of the most common approaches is a system that reduces radon entry by creating suction under the slab and venting that soil gas safely outside. You’ll often hear this described as “sub-slab depressurization.”
Here’s the homeowner-friendly concept:
- Radon is coming from the soil.
- A mitigation system creates a controlled pathway for soil gases to move out of the ground and out of the house, instead of up into living space.
- A fan typically helps maintain consistent suction so the system works continuously.
Common system elements (what you might see)
- Suction point(s): a location where the system draws soil gas from beneath the slab
- Piping: typically PVC piping that routes suction to an exhaust point outside
- Radon fan: usually installed outside living areas (location depends on design)
- Exhaust termination: where the system vents above the roofline or in a way that meets applicable guidelines
- Monitoring indicator: many systems include a simple gauge (often a manometer) to show the system is operating
- Sealing details: sealing cracks or sump lids to improve performance (not as a stand-alone fix)
Important: Exact system design, placement, and vent termination details should be determined by qualified radon professionals and coordinated with your remodel team and local requirements.
Where radon mitigation fits in the basement finishing timeline
Homeowners often ask, “Do I do radon mitigation before or after I start finishing?” The best answer is usually: as early as your project allows, and ideally before you close up walls and ceilings.
A simple timeline that works for many remodels
- Test early: Get results before finalizing the design.
- Confirm the strategy: If elevated, decide whether mitigation is needed and what type.
- Coordinate routes and locations: Piping, fan location, electrical, and access points.
- Install / rough-in during early construction: Often before framing/drywall where possible.
- Finish the basement: With the system integrated cleanly.
- Re-test after installation: Confirm performance, then keep documentation.
Why it’s easiest before walls go up:
- You can route pipes through framing cleanly without soffits.
- Electrical for the fan can be planned and inspected as part of the remodel.
- Monitoring indicators can be placed where you’ll actually see them.
- Service access can be designed instead of improvised.
Radon system coordination: the details that keep your finished basement clean and serviceable
This is the part most homeowners don’t hear about until it’s too late: a radon system isn’t just “a pipe somewhere.” It’s a system that needs:
- a logical route,
- safe electrical planning,
- access for future service,
- and compatibility with your insulation, HVAC, and layout.
That’s what we mean by radon system coordination.
1) Pipe routing that doesn’t ruin ceiling height or design
Basements are already sensitive to ceiling height. If mitigation piping is added after the basement is finished, it can lead to boxed soffits or awkward chases that cut into headroom.
When planned early, piping can often be routed:
- through mechanical rooms, storage rooms, or utility areas
- inside wall cavities where it won’t disrupt the design
- in ways that avoid blocking future access panels or lighting layouts
2) Fan placement: noise, location, and long-term access
Radon fans are typically intended to run continuously. That means fan location matters—especially in a finished basement where people are watching movies, sleeping, or working.
Homeowner considerations to discuss with the radon professional and your remodel team:
- Noise: Is the fan located away from bedrooms and quiet spaces?
- Service access: Can the fan be reached for future replacement without opening finished ceilings?
- Weather exposure: If the fan is outdoors, is it installed in a location that meets manufacturer recommendations and local requirements?
- Electrical planning: Is power routed cleanly and safely, and does it require permitting/inspection?
Important: Electrical requirements vary by jurisdiction and project scope. Always confirm with qualified electricians and local authorities.
3) Sump lids, drains, and slab penetrations: sealing that supports performance
Sealing is often part of mitigation—not because sealant alone “solves radon,” but because sealing obvious openings can help a system work more efficiently and predictably.
If your basement has a sump pit, cracks, or multiple penetrations, ask the radon professional:
- Which openings should be sealed as part of the system?
- How will the sump lid remain accessible for maintenance?
- Will any sealing details impact drainage or other building systems?
Because moisture and radon planning often intersect at the foundation level, these resources can be helpful context:
4) Insulation and air sealing: coordination that prevents unintended side effects
Basement insulation and air sealing are important for comfort and energy performance—but they can also change airflow and pressure relationships in the home. That’s one reason radon testing and mitigation should be planned early during basement finishing.
If your remodel includes significant air sealing, insulation changes, or HVAC adjustments, it’s wise to:
- test early,
- coordinate mitigation decisions with the full remodel scope,
- and re-test after major changes.
Fortress’s homeowner-friendly insulation overview is a good companion read:
5) HVAC and combustion safety (the “don’t skip this” conversation)
Homes are systems. Any time you change air movement or pressure—whether through mitigation fans, ventilation upgrades, or significant air sealing—combustion safety should be evaluated where applicable. This is especially relevant if your home has fuel-burning appliances (like certain furnaces or water heaters) that could be sensitive to pressure changes.
Important: This is not a DIY guessing game. If your home has combustion appliances, consult qualified HVAC professionals and/or radon mitigation professionals who can confirm safe operation and compliance with local requirements.
For broader basement comfort planning, see:
“Do I still need mitigation if I’m finishing the basement?”
You only “need” mitigation if testing indicates elevated levels and guidance recommends action. But finishing the basement changes the stakes in two ways:
- Occupancy: People spend more time in the basement once it’s finished.
- Access: If mitigation is needed later, it’s typically harder to install cleanly without disrupting finished surfaces.
That’s why the most homeowner-friendly strategy is:
Test first. Plan second. Build third. Even if results come back low, you’ll have peace of mind and documentation—and you can proceed without wondering if you should have tested “before drywall.”
Utah radon basement test planning: what’s unique (and what isn’t)
If you’re a Utah homeowner finishing a basement, the most important truth is also the simplest:
Radon potential exists in many areas, and testing is the only way to know your home’s levels.
Instead of relying on neighborhood anecdotes (“our neighbor was fine”) or assumptions (“my house is newer”), build a plan around testing and coordination. If mitigation is needed, work with qualified professionals who understand your local conditions and requirements.
Tip: When hiring a radon professional, look for recognized certifications (and confirm licensing/requirements where applicable). Ask how they approach system design and post-install testing.
Radon mitigation planning during basement finishing: a practical “coordination checklist”
If you’re the type of homeowner who likes a clear list, this is for you. Use it during design and again before you start framing.
Radon Mitigation Planning Checklist
A) Testing + Documentation
- Complete a radon test before basement finishing (follow kit instructions).
- Save results (photo + PDF) and note the date/season.
- If results are borderline or uncertain, plan follow-up testing or consult a pro.
B) System Strategy (if mitigation is needed)
- Confirm the mitigation method recommended for your home.
- Discuss whether one suction point is expected to work or whether multiple may be needed.
- Clarify where the vent will terminate and how it will be routed (attic, exterior wall, etc.), per applicable requirements.
C) Design + Layout Coordination
- Identify mechanical/storage areas where piping can be routed cleanly.
- Avoid routing through bedrooms or prominent living areas when possible.
- Plan a location for the system monitor/indicator where you’ll actually see it.
- Confirm access for future service (fan replacement, sump access, etc.).
D) Electrical + Permitting
- Plan electrical needs early (power for the fan; requirements vary by location).
- Confirm whether permits/inspections apply to the mitigation installation or electrical work.
- Coordinate electrical rough-in timing with the basement remodel schedule.
E) Insulation/HVAC Integration
- Coordinate mitigation planning with air sealing and insulation strategy.
- Discuss ventilation/HVAC changes with qualified pros (pressure and combustion safety considerations where applicable).
- Re-test radon after major system changes or after mitigation install.
F) Post-Install Verification
- Re-test after mitigation to confirm results.
- Keep system documentation, warranty info, and installer contact.
- Learn the basic “is it working?” check (how to read the indicator, what to do if it changes).
Power outages and mitigation fans: do you need backup power?
Many radon mitigation systems rely on a fan that runs continuously. If your area experiences frequent power outages—or if the basement is a primary living space—you may want to discuss backup power options with your mitigation professional.
This doesn’t mean every homeowner needs a whole-home backup system. But it’s worth understanding the concept:
- If power goes out, a fan-powered system may stop operating during the outage.
- When power returns, the system typically resumes operation.
- If you want uninterrupted operation during outages, a battery backup or generator strategy may be considered.
Important: Any backup power solution should be planned safely and installed/used according to manufacturer instructions and local electrical requirements.
Ongoing homeowner care: what to watch after you finish the basement
One underrated part of radon planning is simply making sure the system remains easy to monitor after the remodel. You don’t want a system indicator hidden behind a storage shelf or tucked into an inaccessible corner.
Simple homeowner habits that help
- Know where your monitor/indicator is and how it’s supposed to look when operating normally.
- Keep access clear to any serviceable components (fan area, sump lid, etc.).
- Re-test periodically or after major changes (new HVAC, major air sealing, renovations).
- Respond quickly if you suspect the system is not operating (contact a qualified pro).
Common homeowner questions (PAA-style) about basement finishing and radon
Should I do a radon test before basement finishing?
In most cases, yes—because it’s the easiest time to make informed decisions. If a test indicates elevated levels and mitigation is recommended, it’s typically far easier to integrate piping, fan placement, electrical, and access before the basement is finished.
Can finishing a basement change radon levels?
Finishing can change airflow patterns, air sealing, and how the space is heated/cooled. Those changes can affect how gases move through the home. Because you can’t reliably predict the impact, testing and post-work verification are the best approach.
Is sealing cracks enough to solve radon?
Sealing is often a supportive part of mitigation, but it’s generally not treated as a stand-alone solution for elevated radon because radon can enter through many pathways. A qualified radon professional can recommend an approach appropriate for your home.
Do I need to retest after mitigation?
Yes. Post-install testing is how you confirm that the system is doing what it’s supposed to do. Keep those results with your home documentation—especially helpful if you sell later.
Will I need permits for radon mitigation?
Permit and inspection requirements can vary by jurisdiction and project scope—especially when electrical work is involved. If you’re mitigating as part of a basement finish, it’s smart to confirm what applies with your contractor and local authorities. Fortress offers a Utah-focused overview of basement finishing permits and inspections here:
How Fortress Builders helps homeowners plan basement systems with confidence
A finished basement should feel like a natural, comfortable extension of your home—not a space with lingering worries or “we’ll deal with that later” issues hidden behind drywall.
Fortress’s design–build approach is built for exactly this kind of coordination. Instead of treating radon, moisture, HVAC, insulation, and electrical as separate conversations, the team helps homeowners align the full plan early—so construction moves forward with fewer surprises and better long-term results.
Explore related services and planning resources:
- Basement Finishing in Utah: Space, Comfort & Value
- Basement Moisture Management & Protection Systems
- Basement HVAC & Ventilation Planning
- Basement Remodel Portfolio — Finished Spaces
Plan radon early—so you don’t pay for rework later
If you’re finishing a basement, a radon test before basement finishing is one of the smartest early steps you can take. If mitigation is needed, coordinating the system before walls and ceilings go up can save time, protect your design, and keep the finished space clean and serviceable.
Request a Consultation Explore Basement Finishing Moisture Checklist (Companion)